

Rain runs toward the spot where you're planning a patio, pools along the turf edge, and leaves muddy soil at the bottom of the yard. A decorative wall may seem like the obvious fix, but if it traps water or sends runoff toward a lower terrace, it can make the problem worse.
A retaining wall for a sloped backyard is part of a larger grading and water-management system. Before choosing a finish or comparing prices, get clear on the slope, soil, nearby loads, drainage route, and how construction equipment will reach the site. Those details shape what the wall needs to do, what approvals may apply, and whether the finished yard will work as intended.
Start With the Backyard Problem
A homeowner sees a muddy planting bed and a patio that won't sit level. They picture a low stone wall, a strip of artificial turf, and a clean edge between the two. But after rain, water moving downhill may be arriving from above the proposed wall, from a roof downspout, or from saturated soil behind it. A wall that holds back soil without a plan for that water can leave the homeowner with a more serious drainage problem than the one they started with.
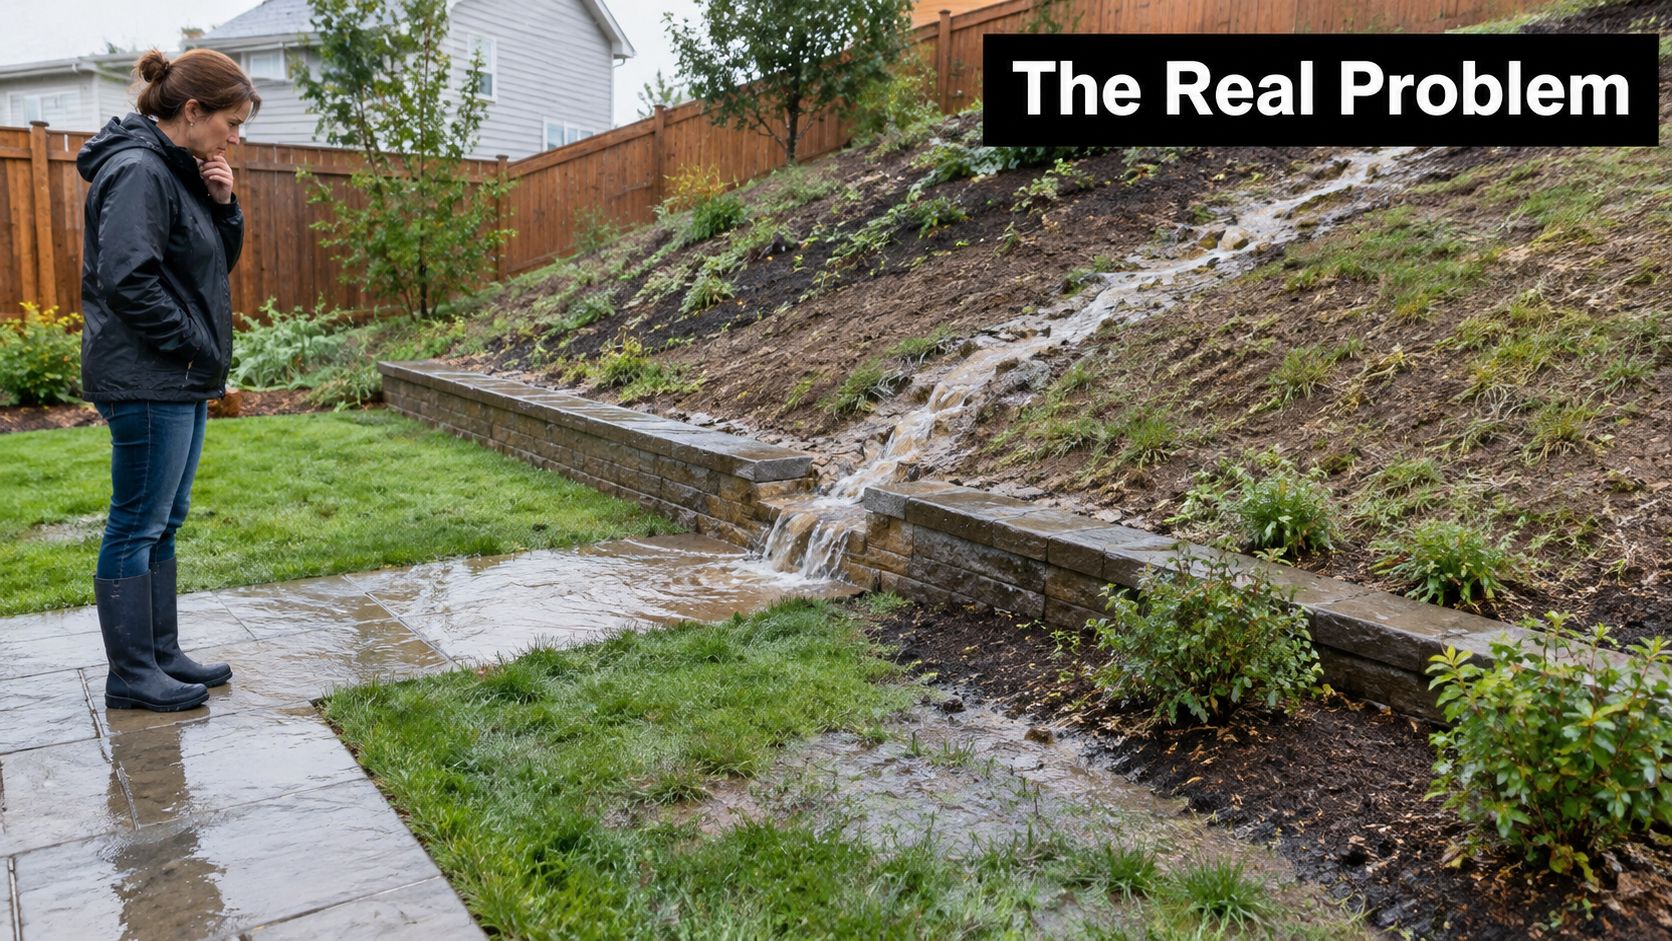
Treat the wall as a site project, not a standalone barrier. Its success depends on how the upper yard sheds water, how the wall supports the soil, where collected water goes, and whether the lower yard can safely receive it. Access matters too: a narrow gate, mature trees, existing steps, or a nearby foundation can affect excavation, material handling, and the construction sequence.
Water management comes before decorative finish. Choose the appearance only after the grading, structural approach, and drainage route make sense.
For Austin-area homeowners, the visible wall height is only part of the picture. Clay-rich soils may hold water and change with wet and dry conditions, while a patio, driveway, fence, pool, or building near the top of the slope can add load. A short exposed face may also retain more soil than it appears to if part of the wall or footing sits below grade.
The useful question isn't, "What will this wall look like?" Ask what the contractor has checked, what the proposal includes, and what needs professional design or a site visit. A trustworthy proposal should make its assumptions clear rather than price a wall from a photograph or a vague square-foot estimate.
Plan the Site Before Choosing a Wall
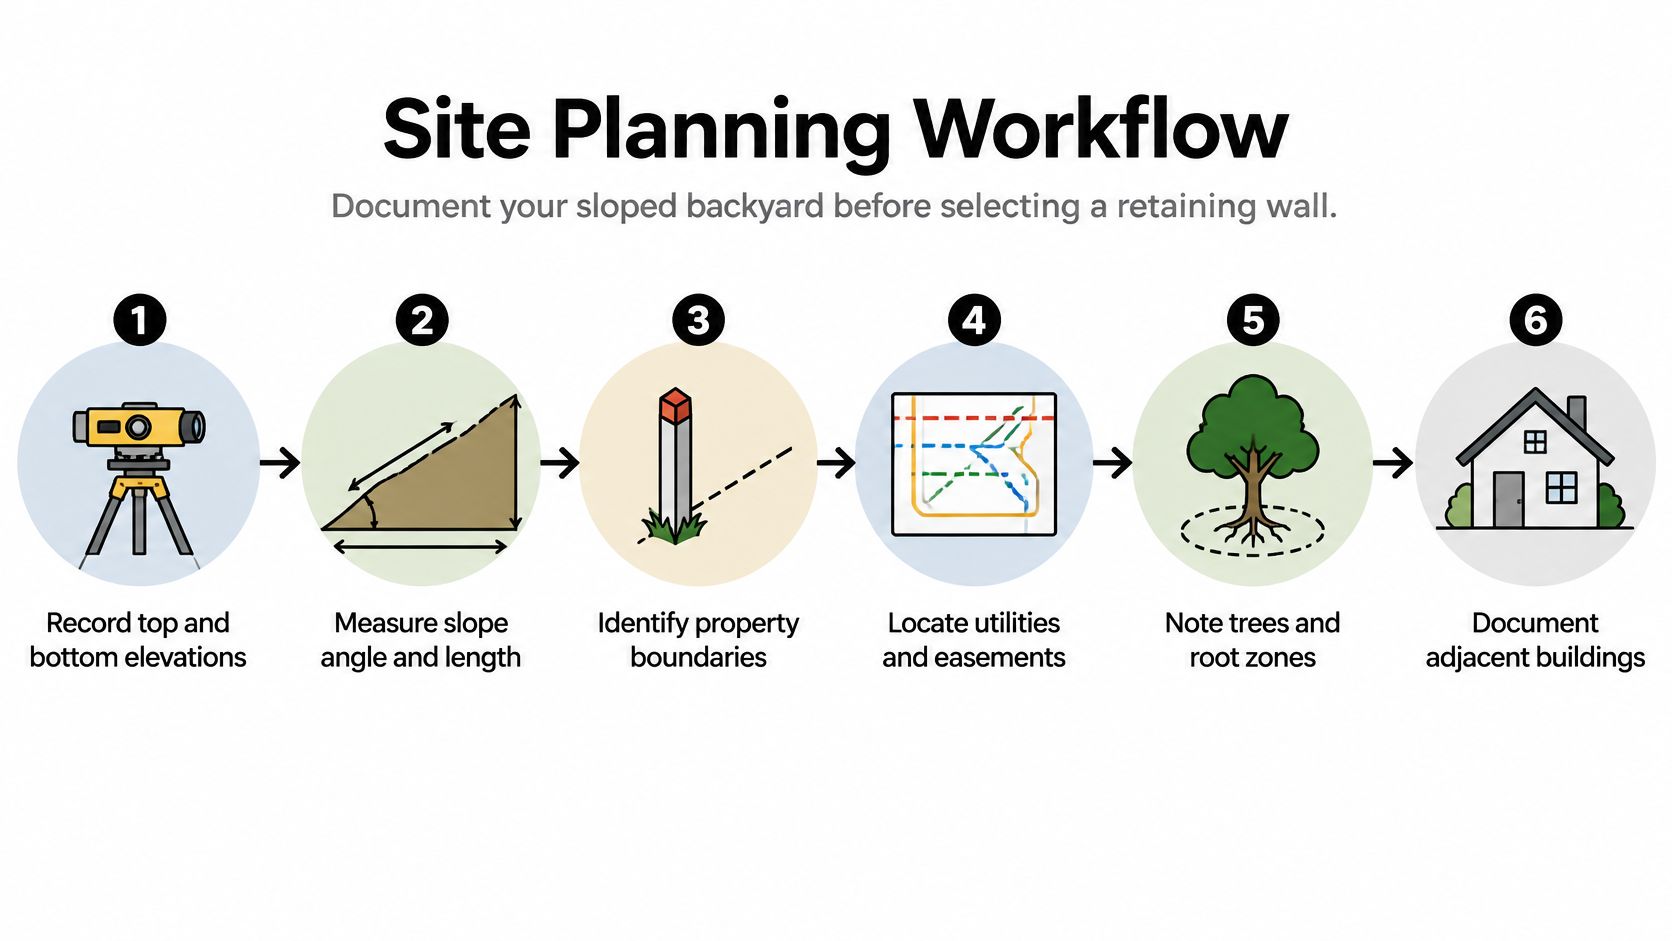
Start by documenting the yard as it exists, not as you hope it will look after landscaping. A contractor or engineer needs to understand the changes in elevation, the direction of the slope, and the space available for the wall, its base, and drainage components.
Prepare for a site visit
Walk the property with a simple site sketch, photographs, and notes about where water travels during rain. Mark or identify:
- Top and bottom elevations: Record the ground levels around the proposed wall, not just the height of its visible face.
- Slope shape: Note where the grade steepens, flattens, or changes direction.
- Property lines and easements: Confirm where construction can take place and whether access or drainage could affect a neighboring property.
- Utilities, trees, and roots: Identify known underground services, tree locations, and areas where roots may constrain excavation.
- Nearby structures and downspouts: Include foundations, patios, driveways, fences, pools, and roof-water outlets.
- Planned finished areas: Show where turf, a putting green, planting beds, or hardscape will sit in relation to the wall.
A low-looking wall can conceal a substantial footing or retain a taller slope than the exposed section suggests. That distinction matters when a paved area or other surcharge is planned near the upper edge. Don't let a proposal treat a proposed patio or driveway as an afterthought if it will change the load or runoff.
Ask what the design is based on
Site-specific design may require information about the retained soil, foundation conditions, groundwater, and weak layers. A qualified designer evaluates those conditions alongside wall type, reinforcement, drainage, and stability. For a sloped site, slope stabilization techniques for residential landscapes can help you think beyond the wall face to the wider grade and erosion problem.
Useful proposals describe the wall's height and position, what assumptions were made about soil and water, how drainage will reach an outlet, and what reinforcement or tie-back approach applies. The design process should also consider sliding, overturning, bearing pressure, structural capacity, and stability of the slope as a whole. If the estimate names a material but says little about those issues, ask for the missing detail before comparing prices.
Compare Wall Systems and Materials
There isn't one material that suits every sloped yard. The right choice follows the design, available space, access, load, and drainage plan. Ask your contractor how the proposed system fits those conditions before deciding based on color or a photograph.
| Wall system | Where it can fit | Drainage and design focus | Key homeowner question |
|---|---|---|---|
| Segmental concrete or masonry units | Residential terraces where the system's footprint and appearance suit the site | Base preparation, reinforcement where required, backfill, and a planned drainage route | What reinforcement and soil assumptions does the design use? |
| Poured concrete | Layouts where a continuous wall suits the design or site constraints | Foundation conditions, structural design, water management, and construction access | How will the wall be formed, drained, and inspected before backfill? |
| Engineered or proprietary system | Sites where project-specific design, system requirements, or loads call for a defined approach | Manufacturer or engineer requirements, connection details, reinforcement, and drainage | Who is responsible for confirming the system suits this slope and load? |
A segmental system may work well where a residential slope needs a terraced edge and the planned footprint is available. Poured concrete may suit a different layout or structural condition. Neither option is automatically stronger or more appropriate in every setting. Base width, footing details, reinforcement, tie-backs, soil assumptions, and workmanship all affect performance.
Appearance deserves a place in the decision, but it shouldn't lead it. A natural stone look, concrete finish, or contrasting surface may complement the home, just as homeowners researching exterior cladding from Varun Marbles may be comparing exterior finishes. Cladding and a retaining-wall structure serve different purposes, so keep the structural design and finish specification distinct.
Also discuss construction order and repair access. The contractor should explain what gets built first, how the drainage components will be protected during backfill, and how the system could be inspected later. For a broader overview of options, review materials for retaining walls, then ask which choices best suit your site.
Design Drainage Before Construction Begins
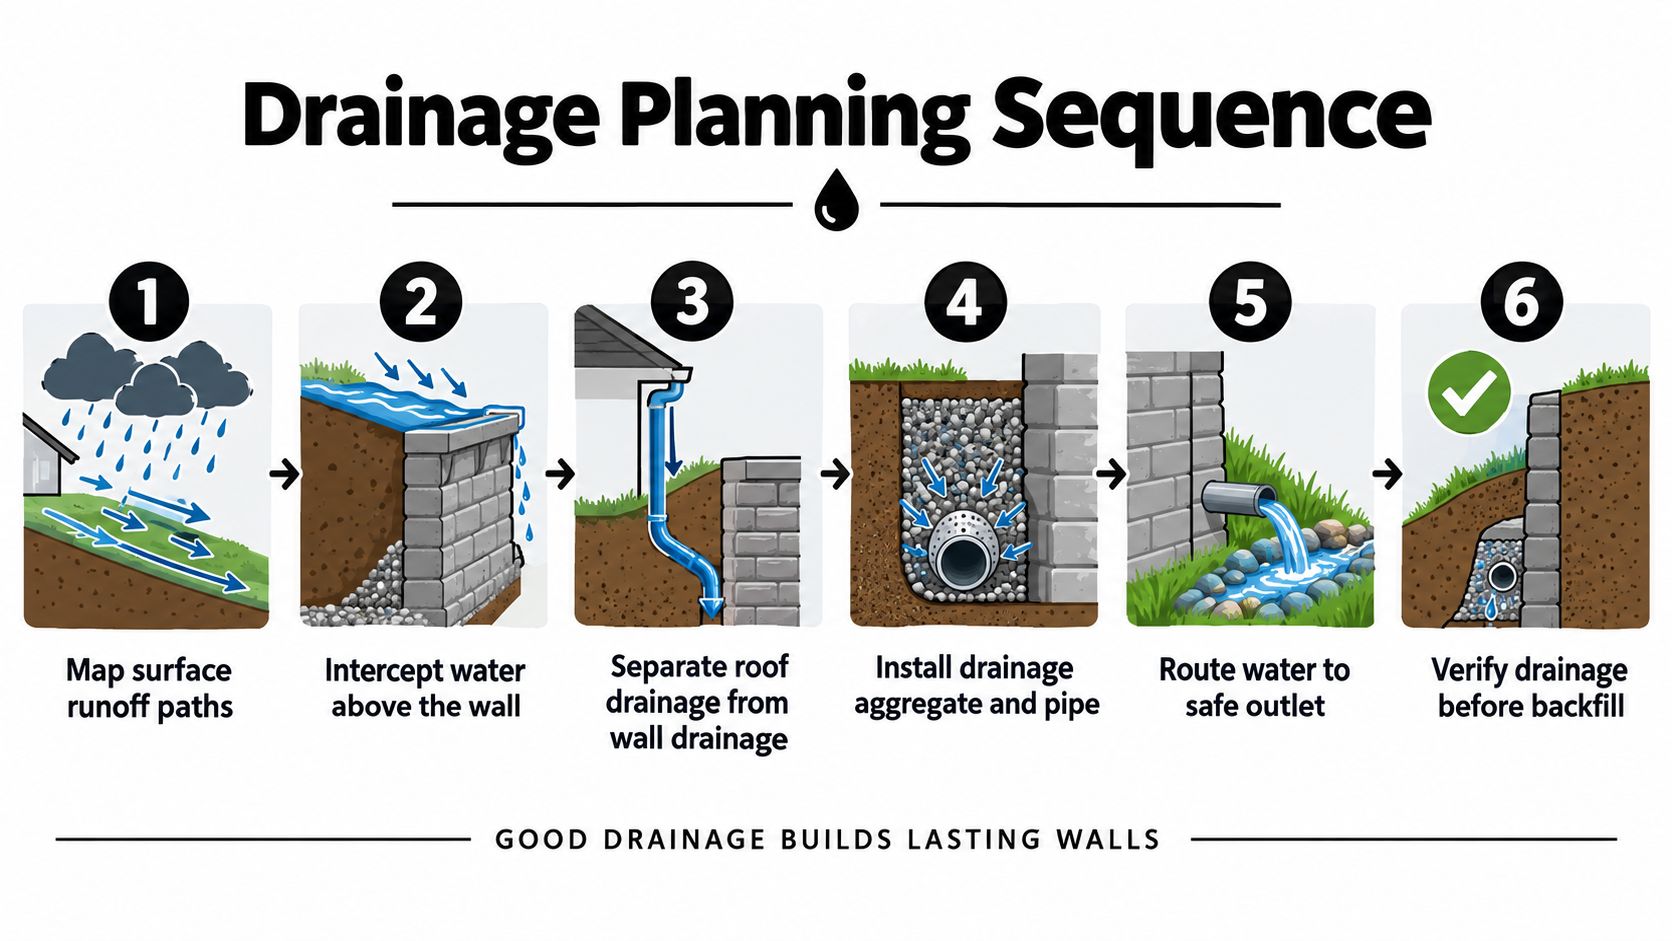
Rain that soaks into the soil behind a wall makes the backfill heavier and adds lateral pressure on the structure. Treat drainage as a core part of the design, sized before the first footing is dug. A typical residential drainage detail uses a clean gravel zone, filter fabric to limit soil fines migrating into that zone, and a perforated drainpipe near the base, as covered in this guide to retaining wall drainage. The right configuration depends on your soil, your slope, and where the water can legally and safely exit.
Trace the water before excavation
Walk the yard during or right after a rain. Note where runoff starts, where it concentrates, and where it leaves the property. Then separate the paths:
- Intercept water above the wall if runoff travels down the upper slope toward the structure.
- Keep roof drainage distinct from the wall's subsurface drainage plan. A downspout shouldn't discharge into the wall backfill unless the design specifically accounts for it.
- Provide a maintainable route from the drain to an outlet you can find, check, and clear.
- Check the receiving area so concentrated discharge won't scour the footing, erode a lower slope, or flood a neighbor's yard.
A 4-inch perforated pipe is commonly used in residential applications, and published guidance commonly identifies a positive slope of approximately 1% to 2% toward the discharge point as a minimum range, as described in this yard drainage system installation guidance. Treat those as reference dimensions, not a substitute for a site-specific design. The outlet location and the ground it discharges onto matter as much as the pipe itself.
Coordinate finished surfaces with drainage
Artificial turf doesn't make runoff disappear. Compacted subgrades and hardscape redirect water, and a finished grade that funnels flow along a turf edge or patio can push it straight toward the wall. Plan surface grading, subsurface drainage, wall construction, and the outlet together, before a single paver or roll of turf goes down.
Ask where the outlet will terminate, how you'll inspect it, and how it can be serviced without tearing up finished surfaces. If the proposed outlet sits below the area it needs to drain, make the contractor explain exactly how water reaches it. That conversation may change the discharge method or the wall elevation, and it costs far less to have now than after the yard is finished.
An attractive wall can still fail if water is trapped behind it.
Build the Wall in the Right Sequence
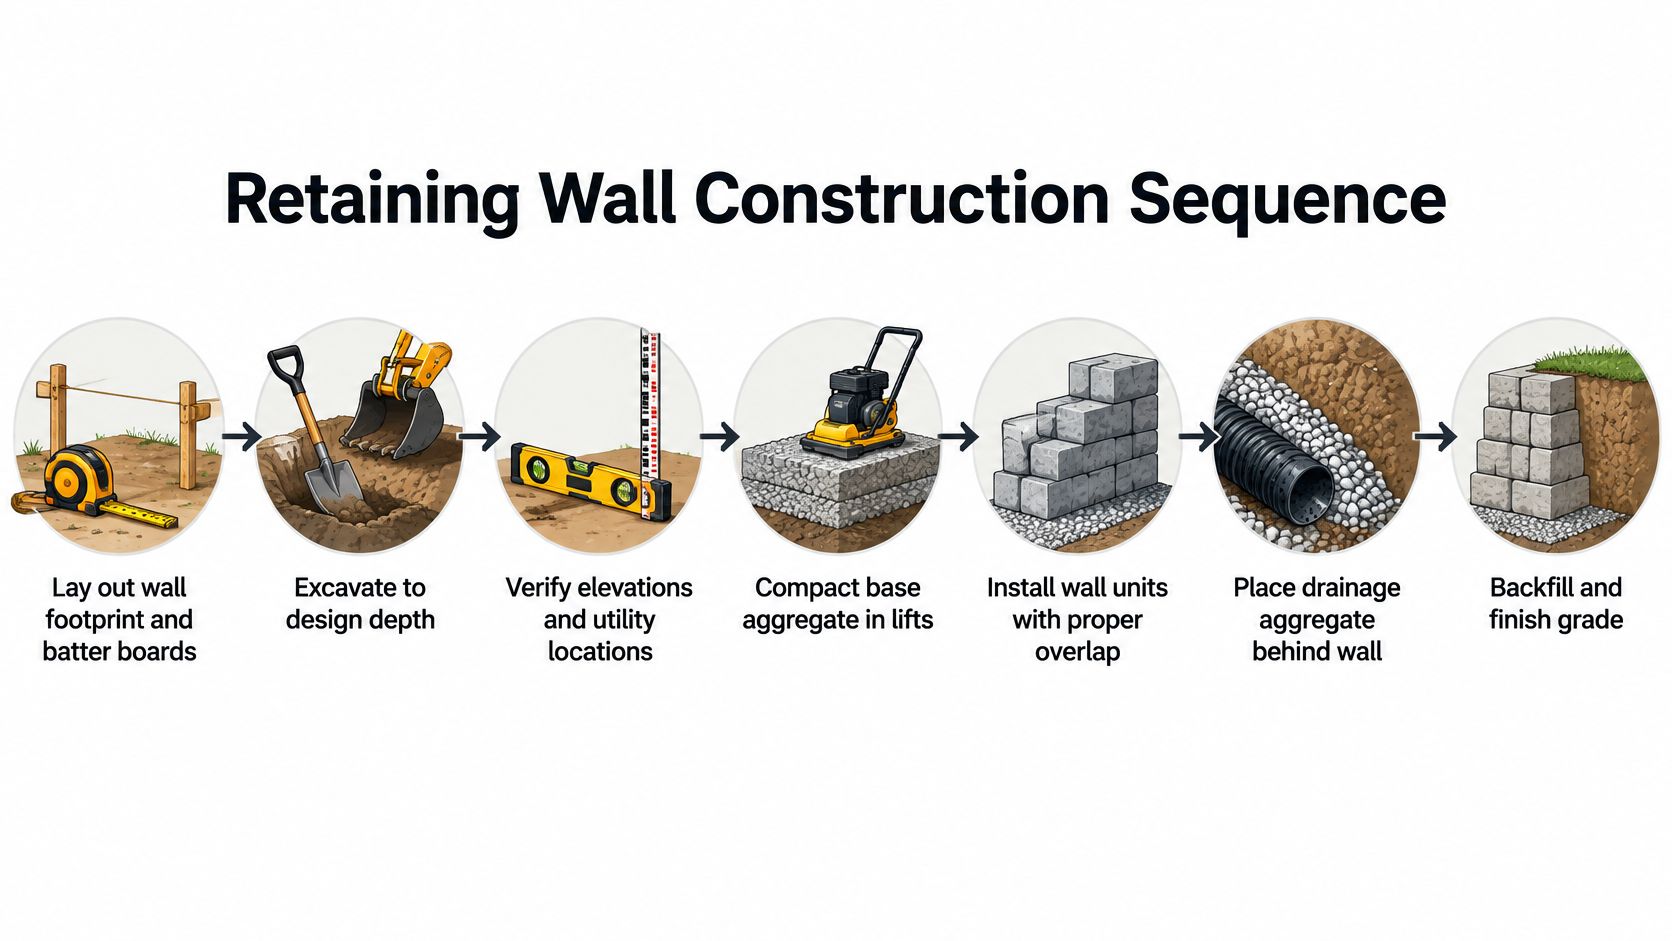
Even a sound design can be compromised by rushed construction. Before digging, the contractor should lay out the wall footprint and confirm elevations, access, and utility locations. The crew needs to know where excavation can safely happen and where removed soil and materials will be handled.
Build from the ground up
Excavation should follow the approved design, not a crew's guess based on the exposed wall face. Once the base area is open, the installer should check that the foundation conditions and elevations align with the plan. If the crew encounters unexpected weak soil, groundwater, buried material, or a change in the slope, pause and get the right professional to assess it before building over the problem.
Next comes base preparation and the wall system itself. The base needs to be stable and prepared to match the design. Place drainage components before backfill, then assemble the selected wall with the specified reinforcement, connections, or tie-backs. Backfill and compaction should follow the design rather than placing a large volume of soil at once; the method and sequence affect the support around the structure.
Don't let schedule pressure bury work that needs to be checked. Ask when the drainage components and reinforcement will be visible for review, and whether the project calls for an engineer or other inspection before backfill.
Protect the finished plan
Turf, patios, fences, and planting should follow the wall and drainage work, not block it. A contractor should coordinate the sequence so later excavation doesn't cut through a drain, add an unplanned load, or change the finished grade. That's particularly important if you're planning a low-maintenance lawn or hardscape immediately above the wall.
An experienced contractor may be suited to a straightforward project with appropriate design and clear conditions. A wall supporting a driveway, patio, building, steep slope, or concentrated runoff deserves site-specific engineering review. The Austin-area wall guidance also identifies engineering as prudent where soil or loading conditions raise the structural demand, as explained in this retaining wall planning guide.
Before accepting completion, walk the site with the contractor. Is the outlet clear? Has the exposed slope been protected? Does the finished grade direct water away from the wall? Do you have maintenance instructions and written warranty information? Get clear answers before the crew leaves.
Check Permits Height and Contractor Scope
A wall that looks short from the lawn may still have important engineering or permit implications. In Austin, a wall over 4 feet high, measured from the bottom of the footing to the top of the wall, requires a building permit inside city limits; projects affecting drainage or the environment may also require a site-development permit. Austin guidance also identifies a building-permit exemption for a wall no more than 4 feet high, measured from the footing bottom to the wall top, if it doesn't support a surcharge and isn't in a flood-hazard area. Confirm the current rules and your property's jurisdiction through Austin's permit information.
Travis County uses a different benchmark: walls exceeding 5 feet require structural design sealed by a Texas-licensed engineer, along with engineering and drainage reports for the site, according to the Travis County retaining-wall permit requirements. These are jurisdiction-specific requirements, not universal rules. Confirm whether the property falls under Austin, Travis County, or another authority before you rely on a contractor's permit assessment.
Ask for a written scope
Surcharge loads can change the design even when the face looks modest. A driveway, patio, fence, pool, or structure near the upper edge may affect engineering review. A series of shorter, stepped walls also shouldn't be assumed to avoid review; terraces need to be evaluated as a connected system so an upper wall doesn't add load to the one below.
Before signing, ask for a written response to these points:
- Jurisdiction and permits: Who confirms which authority applies, and what approvals are needed?
- Wall height: Is it measured from the bottom of the footing to the top?
- Loads and foundations: What nearby structures or hardscape were included in the design?
- Drainage: Where does the outlet discharge, and how can it be inspected?
- Engineering and access: Who provides design review, and how will materials reach the site?
- Restoration and warranty: What ground repair is included, and what are the written coverage terms?
Fences can add a separate property-rule question. If one is part of your plan, use a resource on fence height bylaws as a prompt to check applicable local requirements, then confirm them with the governing authority. For contractor selection, start with a retaining wall contractor assessment that makes design, drainage, and documentation part of the conversation, not optional extras.
Verify the Finish and Plan Maintenance
After installation, look for settlement, leaning, bulging, cracks, persistent wet spots, blocked outlets, erosion where water discharges, and changes to the finished grade. A buried drain is out of sight, so keep a record of its route and outlet location. Ask how to inspect it and how repairs can be made without unnecessary damage to turf or pavers.
Artificial turf, patios, and low-maintenance planting above the wall should follow the original grading and drainage plan. Don't let later upgrades redirect water or obstruct access to an outlet. Keep the final invoice, completion photographs, and warranty terms together. Check that the agreement names covered workmanship or materials, the coverage period, exclusions, maintenance duties, and how to report a problem. The FTC's warranty guidance recommends checking coverage and following the written claim process; apply that documentation discipline to your wall contract.
For additional maintenance context, see this guide to Auckland retaining wall repair advice. Then schedule an on-site assessment before choosing a finish or committing to construction.
Modern Yard assesses Austin-area slopes, drainage, access, and planned turf or hardscape as part of retaining-wall and outdoor-design work. Visit Modern Yard Landscapes to arrange a site appointment and discuss a wall plan that addresses the whole yard, not just the visible face.