Austin storms have a way of exposing every weak spot in a yard. The rain stops, the sun comes back out, and your lawn still feels like a swamp. Water sits along the fence line. Mud collects outside the patio. A low corner near the house stays soft long after the rest of the block has dried out.
That's usually the moment homeowners start looking up yard drainage system installation and wondering if this is something they can solve with a shovel, gravel, and a free weekend. Sometimes the answer is simple. Often in Austin, it isn't. Clay soil, tight lot lines, artificial turf, retaining walls, and limited slope change the job completely.
A good drainage system doesn't just move water. It protects the yard you use, the hardscape you paid for, and the structure sitting behind it. Getting there takes diagnosis, grading discipline, correct materials, and installation that holds up over time.
Your Soggy Yard Is Not Just an Inconvenience
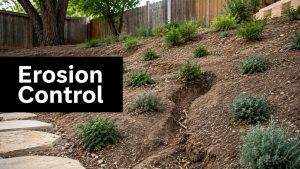
A soggy yard changes how you live outside. Kids avoid the lawn. Dogs track mud inside. Grass thins out in the same wet spots over and over. In more serious cases, runoff starts moving toward the foundation, under fence lines, or behind a retaining wall where you can't see the pressure building.
In Austin, this problem often shows up after a hard rain because clay soil doesn't forgive mistakes. Water doesn't soak in quickly, so it lingers at the surface and looks for the lowest point. If the yard was graded poorly, if the downspouts dump into the wrong area, or if an earlier drain was installed without enough fall, the result is the same. Standing water, soft soil, and damage that gets worse one storm at a time.
Homeowners usually notice the symptom first, not the cause. They see a puddle near the back door and assume the fix belongs right there. But drainage rarely works that way. The wet spot is often where the water ends up, not where the problem starts.
Field reality: The yards that give people the most trouble are often the ones that look almost flat. A small grading error can hold water exactly where you don't want it.
This is also why generic DIY guides leave people frustrated. They show a trench, a pipe, and gravel, then skip the hard part. They don't deal with Austin clay, they don't account for turf systems, and they don't explain what happens when a retaining wall traps water behind the scenes.
A professional approach starts with reading the property like a drainage map. Only after that do you choose the system, set the outlet, and build it so it keeps working.
Diagnosing Your Austin Yard Drainage Problem
The first job isn't digging. It's figuring out what kind of water you're dealing with and why it's collecting where it does.

Read the yard during and after rain
The best time to diagnose a drainage problem is when the yard is actively showing it. Walk the property during a storm if it's safe, or right after the rain ends. Watch where water leaves the roof, where it sheets across the lawn, where it slows down, and where it finally stalls.
Pay attention to these clues:
- Fast surface flow: Water runs across the yard and collects in visible low spots.
- Slow seepage: The lawn stays soft for days, even when there isn't a strong stream of runoff.
- Edge failures: Fence lines, patios, and planting beds hold moisture because they interrupt natural escape paths.
- Foundation concern: Water gathers near the slab or repeatedly moves back toward the house.
A lot of Austin drainage problems are mixed problems. There may be roof runoff, shallow surface pooling, and subsurface saturation all happening together.
Surface water versus subsurface saturation
A French drain and a surface drain don't solve the same problem. That's where many homeowners get steered wrong.
Here's a practical way to separate the issues:
| Problem pattern | What it usually points to | Typical solution type |
|---|---|---|
| Water ponds on top after every storm | Surface collection issue | Catch basins, channel drains, grading |
| Soil stays wet below the surface | Subsurface moisture issue | French drain or collector line |
| Water crosses a driveway or patio edge | Hardscape interception issue | Channel drain |
| Runoff needs a place to disperse | Limited discharge options | Dry well or controlled outlet |
Austin clay complicates this because the soil slows infiltration. Water can look like a surface problem when the actual issue is that the ground below is already saturated.
The flat-lot question Austin homeowners keep asking
One of the most common questions is whether a flat, compacted clay yard can drain without a pump. The answer is sometimes yes, but not with the simplistic approach most online guides assume. A useful reference on French drain installation methods from NDS notes a gap in generic guidance for flat lots and highlights a gravity-assisted combo approach using micro-grading and deep perforated collectors to create artificial head pressure, which can avoid a pump in many situations.
That matters in Austin because many properties don't have obvious natural fall, but they still have enough workable elevation change for a carefully designed gravity system.
If you want a deeper look at common causes before committing to excavation, this guide on how to fix yard drainage is a useful starting point.
Flat doesn't always mean impossible. It usually means the diagnosis has to be more exact.
Match the system to the source
A few system types come up repeatedly in residential yard drainage system installation:
- French drains work when water is moving through or lingering in the soil.
- Catch basins collect concentrated surface water from low spots.
- Channel drains protect transitions like patios, walkways, and driveways.
- Dry wells can help when water needs a controlled place to disperse.
The wrong system may move some water for a while, but it won't solve the site. The right system starts with the pattern, the soil, and the discharge path.
Creating Your Drainage Blueprint and Choosing Materials
A drainage plan has to work on paper before it ever works in the ground. Many failed installs typically begin to go wrong at this preliminary stage. People know where the puddle is, but they haven't mapped where the water will enter, how it will travel, or where it will leave the property.

Start with path, outlet, and fall
Every blueprint begins with three questions.
Where will the water enter the system?
Where is the legal and practical outlet?
Is there enough consistent fall from one point to the other?
The most critical specification is slope. A consistent slope gradient of 1% (1 inch drop per 8 feet), checked every 5 feet during trenching, is a core requirement. Slopes under 0.5% are a common failure point because sediment builds up and clogs the run, often within 6 to 12 months. That's why grade checking can't be casual. It has to be measured repeatedly, not guessed from eye level.
In practice, crews use stakes, a string line, levels, and repeated trench checks to keep the run honest. A drain only works if every section works.
Material choices that affect long-term performance
Material selection is where trade-offs show up fast. Homeowners usually compare price first. Installers think about shape retention, flow, soil movement, and maintenance access.
A simple comparison helps:
| Material or component | What works well | Where it can go wrong |
|---|---|---|
| Rigid PVC pipe | Holds grade well, smooth interior, stronger alignment control | Less forgiving in tight curves |
| Flexible corrugated pipe | Easier to snake through some layouts | Easier to mis-grade and harder to keep consistently aligned |
| Washed gravel | Supports flow and filtration | Dirty aggregate introduces fines into the system |
| Geotextile fabric | Separates soil from stone when used correctly | Poor wrapping can choke the system |
The pipe decision matters most when the yard has clay movement, roots, or long runs where sagging becomes a problem. The gravel decision matters because the stone bed isn't just filler. It helps water reach the pipe and supports the trench structure.
If you're comparing subsurface options, this page on drain tile system installation gives a useful overview of how these systems are laid out in real yards.
Plan for the parts nobody sees later
A durable system also accounts for the details that disappear once the trench is closed:
- Access points: You want a way to inspect or flush lines if needed.
- Transitions: Tie-ins at downspouts, basins, or emitters need clean connections.
- Surface restoration: Sod, rock, mulch, or turf all affect how the trench should be finished.
- Utility conflicts: Irrigation, lighting wire, gas lines, and cable routes can change the path.
Practical rule: If the outlet, grade, and material sequence aren't clear before excavation starts, the install is already at risk.
This planning stage is where one option among others, such as services from Modern Yard Solutions, can be useful if you want help translating a wet yard into an actual buildable drainage layout.
The Professional Process for Trenching and Installation
Drainage is one of those jobs that looks straightforward from the sidewalk. Then the trench opens up, the grade starts changing, the spoil pile grows, and every shortcut becomes obvious.

Excavation is where precision starts
A proper trench isn't just a ditch. It has to be the right depth, the right width, and the right elevation at every point along the run. In Austin yards, that can mean working around tree roots, limestone, irrigation lines, fencing, and narrow side-yard access that limits machine use.
Most failures don't happen because the idea was wrong. They happen because the trench wasn't consistent. A slight belly in one section creates a holding point. Once debris settles there, the line starts slowing down. Then it stops acting like a drain and starts acting like a buried trough.
That's why experienced crews keep checking the trench as they go instead of assuming the first cut held true all the way through.
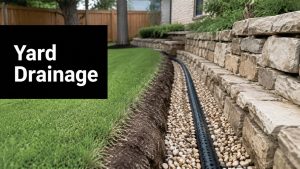
Bedding, pipe placement, and backfill sequence
Once the trench is shaped correctly, the installation sequence matters.
A common professional method includes:
- Prepare the trench base with the proper stone bed so the pipe has stable support.
- Set the pipe correctly and keep the run aligned without twists or dips.
- Surround the pipe with gravel so water can move through the aggregate before entering the line.
- Complete the wrap and backfill in a way that protects the system from soil intrusion.
One detail homeowners often miss is pipe orientation. Perforated pipe needs to be installed as designed for the system, and crews have to keep that orientation consistent during placement and backfill. If it shifts while the trench is being filled, the system won't collect water the way it was intended to.
Fabric mistakes ruin good drainage work
Fabric installation looks minor until it fails. Then the whole system starts filling with fines.
A critical pitfall is improper wrapping of the trench fabric. Improper wrapping causes 40% of premature clogs, and soil intrusion is behind 65% of clogged drains when the trench isn't lined and folded correctly. The right method is to leave excess fabric along the trench and fold it over the gravel to form a sealed tube around the drainage stone and pipe.
That sequence matters because the fabric isn't there to trap water. It's there to separate soil from the aggregate while still allowing infiltration. Pull it too tight, overlap it poorly, or use dirty gravel, and the system starts losing capacity early.
The trench wrap is one of the least visible parts of the install and one of the most important. Once it's buried, the only way to fix it is excavation.
For homeowners who like seeing how drainage principles are handled in different site conditions, a practical outside reference is Harrlie Plumbing Eastbourne, which shows how drainage service decisions often come down to access, water source, and long-term maintenance rather than just the trench itself.
Site restoration is part of the install, not an afterthought
A clean drainage project ends with a yard that still functions and looks intentional. That means restoring grade, resetting disturbed lawn areas, protecting patios and edging, and making sure the discharge point is visible and serviceable.
This is also where integrated design matters. A drainage line running through a lawn is one thing. A line that has to work beside planters, hardscape, and existing outdoor features is another. If you're comparing layout options, these drainage solutions for yards show how different site conditions call for different combinations of drains, collectors, and outlets.
Labor is substantial, but the primary value is control. Good crews control depth, fall, material sequence, and finish quality at the same time.
Integrating Drainage with Turf and Retaining Walls
Drainage shouldn't be treated as a separate utility buried somewhere under the yard. In Austin outdoor areas, it has to work with whatever sits above it and beside it. Two of the most overlooked combinations are artificial turf and retaining walls.

Why turf changes the drainage conversation
Artificial turf has its own drainage profile. The backing, infill, base preparation, and edge conditions all affect how water moves. A standard French drain detail that works under open lawn can fail under synthetic grass if the filtration layers fight each other.
That's a known issue in this market. A Home Depot guide on French drain installation is relevant here because the broader discussion around French drain fabric misses a key turf-specific risk. In Austin, the double-layer filtration problem can block the high-permeability infill layer, contributing to 40% to 60% of turf drainage failures when standard fabric is used at the turf-drain interface. For turf applications, a more permeable geo-mesh is the safer approach than traditional fabric in that transition zone.
That's the kind of issue generic yard drainage system installation tutorials almost never address. They treat turf and drainage as separate scopes. On an actual project, they are one system.
If your yard already has synthetic grass or you're planning it alongside drainage work, these artificial turf drainage systems show how the layers need to be coordinated from the base up.
Retaining walls need pressure relief, not just pretty stone
A retaining wall without proper drainage can look fine right up until it doesn't. Water collects behind the wall, the soil gains weight, pressure increases, and movement starts. The visible crack or lean comes late. The water problem started much earlier.
A good wall drainage plan usually includes a collection path behind the wall, drainage aggregate, and a route for water to escape without eroding the face or washing out the footing area. The details vary by wall type and site constraints, but the principle never changes. The wall must relieve pressure, not trap it.
That same integration mindset shows up in adjacent site work too. For example, when fencing, pergolas, or guard elements tie into concrete near a drained area, the anchoring detail matters. This guide on professional concrete post installation is useful because it highlights how structural attachments and water management often intersect at the same hardscape edge.
A retaining wall problem is often a drainage problem wearing a masonry disguise.
The best results come from coordinated landscape planning
The strongest drainage systems are designed with the rest of the yard in mind. Turf base prep, edging, wall backfill, downspout routing, and finished grade all affect whether the system performs cleanly or ends up fighting neighboring components.
That's especially true on Austin properties where space is tight and every inch of elevation matters.
Protecting Your Investment Why Professional Installation Matters
Homeowners don't hesitate to compare the cost of doing it themselves versus hiring a crew. That's fair. Drainage work is a real expense, and it should be evaluated like one.
The issue is that failed drainage is expensive twice. First when you buy materials, rent equipment, and spend the time. Then again when the system has to be exposed, corrected, or replaced because the grade was off, the outlet was poorly chosen, or the wrong material was buried in the wrong place.
The financial range alone tells you this isn't minor work. Structure Smart's French drain guide places professional yard drainage systems in a range of $3,000 to over $15,000, which reflects the excavation, specialized materials, and installation risk involved. That's exactly why insurance, experience, and accountability matter. If the job affects drainage around your house, walls, patios, turf, or neighboring property lines, you want the crew to know what they're doing and to stand behind the work.
What DIY usually underestimates
Most homeowners don't underestimate the digging. They underestimate everything around it.
- Grade control: The trench has to drain consistently, not just generally downhill.
- Utility awareness: One bad cut can create a bigger problem than the puddle you started with.
- Material handling: Gravel, pipe, fabric, spoil removal, and restoration add up fast.
- Diagnosis risk: If the original problem was misunderstood, a clean install can still fail.
There's also the issue of responsibility. If a contractor is fully insured and provides a satisfaction-backed process, that changes the risk profile for the homeowner. You're not just paying for labor. You're paying for judgment, project control, and a result that doesn't need to be dug up later.
What a consultation should give you
A worthwhile appointment shouldn't feel like a sales script. It should give you a drainage read on your property, identify likely causes, explain the trade-offs, and tell you plainly whether the fix is grading, collection, subsurface drainage, or a combination.
That clarity is what helps homeowners make a smart decision.
If your yard stays muddy, water keeps pushing toward the house, or you're planning turf or a retaining wall and want the drainage handled correctly the first time, schedule a consultation with Modern Yard Landscapes. You'll get a site-specific plan, clear guidance on what's causing the problem, and a practical path to a yard that drains the way it should.