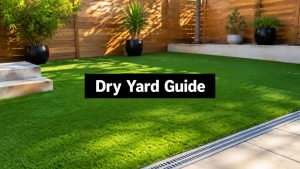
You pull a few weeds on Saturday morning, toss down fresh mulch, and think you've bought yourself a few months of peace. Then Austin does what Austin does. The sun bakes the bed hard, the clay holds water in the wrong places, and the next downpour shifts mulch just enough for weeds to start coming back through seams, edges, and planting holes.
That's why weed barrier installation matters so much here. The fabric itself isn't the whole solution. The result depends on soil prep, drainage, seam work, edge treatment, and the kind of outdoor area you're creating. A gravel side yard needs a different approach than a native planting bed. Artificial turf has its own drainage demands. Established shrubs create different problems than a clean bed before planting.
If you're trying to build a lower-maintenance yard in Austin, the right question isn't “Should I put fabric down?” The right question is “What system fits this site, this soil, and this kind of maintenance?”
Why a Flawless Weed Barrier Matters in Austin

Austin yards punish shortcuts. Our heavy clay can stay sticky after rain, then turn brick-hard in summer. Add intense UV and sudden downpours, and a sloppy install starts failing fast. Fabric wrinkles. Edges lift. Mulch slides. Water finds low spots and sits there.
A lot of homeowners think weed barrier installation means rolling out fabric and pinning it down. In practice, it's more like building a foundation layer. If the base isn't smooth, if the fabric isn't tight, or if drainage isn't accounted for, weeds find daylight and start exploiting every weak point.
That matters whether you're building planting beds, a decomposed granite path, a dog run, or a low-water area inspired by drought-resistant lawn alternatives in Austin. The cleaner and more stable the base, the less time you spend fixing problems later.
What goes wrong in Central Texas
Some failures show up right away. Others wait until the first hard storm.
- Clay holds water badly: If the grade isn't right, water pools under the fabric and softens the base.
- UV breaks down exposed material: Fabric left uncovered gets brittle faster.
- Beds shift in heavy rain: Loose seams and shallow edges can open up after runoff.
- Existing weeds don't disappear: If roots and debris stay in place, you're often covering a problem instead of removing it.
Practical rule: Weed barrier works best when it's treated as part of the whole bed build, not as a last-minute add-on.
Low maintenance starts below the surface
The value of a good barrier isn't just fewer weeds this month. It's a yard that stays cleaner, drains better, and takes less effort to keep tidy through a long Austin summer.
That's why experienced professionals pay so much attention to the parts the average person never sees once the mulch or gravel goes down. A crisp-looking finish is nice. A stable, durable install is what keeps you from redoing the same bed next season.
The Right Weed Barrier for Your Project
Picking the wrong material causes more trouble than skipping fabric altogether. Some products breathe and drain well. Some block light better but can create issues in planted areas. Some are fine for temporary suppression but don't belong in a long-term garden.

In Austin, material choice has to account for drainage first. If water can't move the way the site needs it to, the barrier becomes part of the problem.
Match the material to the job
| Project type | Usually the better fit | Why it works |
|---|---|---|
| Artificial turf base | Permeable geotextile-style fabric | Helps separate layers while still allowing drainage |
| Gravel path or utility side yard | Tough woven fabric | Holds up better under rock and foot traffic |
| Planting bed with shrubs | Depends on bed design and upkeep plan | Fabric can help in some layouts, but maintenance matters |
| Native or soil-building garden | Often mulch-only approach | Supports a more natural soil cycle |
For turf systems, drainage and base separation matter more than aggressive light blocking. If you're comparing options under synthetic grass, it helps to understand the base material choices used for synthetic grass installations.
Where people get talked into the wrong product
Plastic sheeting gets sold as a weed fix because it blocks everything. That's also the problem. It can trap water and create a poor environment in many outdoor applications. In a dry climate with sudden storms, that's asking for trouble.
Woven fabric usually makes more sense under gravel or in places where durability and drainage both matter. Non-woven products can be useful where stronger suppression is the main goal, but the site still has to be built correctly.
A weed barrier isn't automatically good for soil just because it suppresses weeds.
Independent garden guidance from Landscape Discount's weed control fabric overview notes that barrier fabric can reduce soil aeration and water movement, and weeds can still root in the mulch layer on top. That's the part generic advice often skips.
Sometimes mulch is the smarter answer
If the goal is a healthy planting bed with shrubs, perennials, or native plants that need the soil to stay active, a thick organic mulch layer can be the better system. It doesn't mean less planning. It means a different maintenance strategy.
That surprises homeowners because fabric often gets pitched as the default upgrade. It isn't. The right answer depends on whether you want cleaner rock beds, a stable path, a turf underlayment, or a planting area that improves over time instead of getting harder to renovate later.
Site Prep Is Everything for Weed Control
The part that makes or breaks weed barrier installation is the work nobody sees after the job is finished. Many DIY projects falter at this stage. Homeowners clear the visible weeds, unroll the fabric, and assume the rest will sort itself out. It won't.

A durable install starts with a clean, stable subgrade. In Austin, that means respecting how clay behaves. When it's wet, it smears and compacts unevenly. When it dries, every lump, root channel, and buried rock telegraphs upward into the finished bed.
The standard that separates a quick cover-up from a real install
For long-term weed control, deep soil preparation matters. The Upper Big Blue Natural Resources District says soil should be plowed or chiseled to a minimum depth of 12 inches and then disced or rototilled to remove clods or sod before fabric is installed effectively, as outlined in its weed barrier fabric and mulch guidance.
That guidance comes from a tree-row context, but the lesson applies broadly. Good weed suppression starts below the surface. If the soil profile is rough, compacted in patches, or full of old root mass, the fabric has a weak base from day one.
The prep sequence that holds up better
A professional-grade prep process usually follows this order:
- Strip the area clean: Remove weeds, loose roots, old mulch, rock fragments, and construction debris.
- Shape the base: Rake and level the subgrade so the barrier can lie flat without bridging over dips.
- Correct drainage: Build a slight slope where runoff needs direction, especially near foundations, patios, and fence lines.
- Install edging first when appropriate: A defined edge gives the fabric something solid to terminate against.
- Compact and fine-grade: A stable base resists settling and keeps the top layer looking even.
Each one affects the next. If the ground isn't smooth, seams won't sit tight. If drainage isn't built in, water pressure starts moving material around. If edging goes in late, the perimeter often looks patched together.
Why prep takes so long in Austin
Roots from established beds are a big issue here. So is caliche, buried limestone, and compacted clay from previous construction traffic. Those aren't cosmetic problems. They create voids, bumps, and drainage traps.
For turf projects, pathway installs, and gravel utility zones, the base prep has to be even more disciplined. That's why many homeowners who start this job end up realizing the prep is the main undertaking. The fabric part is quick. The excavation, grading, cleanup, and shaping are what eat the weekend.
If you want a close look at how the ground should be built before surface materials go down, this guide on how to prepare ground for artificial turf gives a useful parallel. The same principle applies. Surface performance depends on sub-base quality.
Beds don't fail because the roll of fabric was bad. They fail because the site underneath it wasn't ready.
That's also why weed barrier installation around existing plants is usually harder than people expect. It's much easier to build the barrier first on clean ground and then cut planting openings than it is to snake fabric around mature shrubs, exposed roots, irrigation lines, and uneven old mulch.
Mastering Seams Edges and Drainage
A lot of failed installs look fine on day one. The problems show up later at the seams, around the perimeter, and near every plant opening. That's where weeds sneak in, water gets under the fabric, and wind starts lifting corners.
This part of weed barrier installation rewards patience. You want the fabric lying taut, not stretched thin, but not loose either. A little ripple today becomes a pocket for mulch movement and water tomorrow.
Seams are where weeds test your work
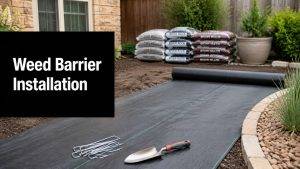
Field-tested installation guidance recommends overlapping fabric sheets by 6 to 12 inches and securing seams and edges with staples approximately every foot, as explained in Lawn Love's landscape fabric installation guide. That overlap range matters because narrow seams are easy failure points.
In practical terms, this means you don't just butt two sheets together and hope mulch hides the joint. Austin storms will expose that shortcut fast. Water runs along the seam, soil shifts, and weed seeds settle right into the gap.
Edge treatment decides whether the install stays put
Perimeters need just as much attention as the middle. The vulnerable spots are bed ends, fence lines, curves, transitions to lawn, and any area where runoff can get underneath.
A good edge strategy often includes:
- Tucked margins: Fabric should terminate cleanly at the edge, not flap loose under mulch.
- Secure pinning: Extra fasteners at corners, curves, and cutouts help prevent lift.
- Protection from washout: In runoff zones, the edge needs support from grading, edging, or both.
- Clean transitions: Where gravel meets lawn or hardscape, the line should resist migration.
If the edge isn't locked down, bermuda and other invasive grasses will take that as an invitation.
The perimeter is your first line of defense. If it loosens, the rest of the bed usually follows.
Drainage isn't optional in Austin yards
Even the best seam work won't save a bed that holds water. Fabric should behave like a drained, tensioned layer. The soil underneath should guide water where you want it to go, not trap it under the barrier.
That's especially important near patios, side yards, downspouts, and low backyard corners. If your property already has standing water or erosion, fabric alone won't fix it. You need a drainage plan first. Homeowners dealing with runoff or soggy zones should look at yard drainage solutions designed for problem areas.
Plant openings should stay small and intentional
The more fabric you remove, the more opportunity you create for weeds. Small X-shaped cuts usually work better than oversized circles because they keep more shaded coverage around the stem or root ball.
That takes restraint. Many DIY installers cut generous holes because it feels easier during planting. Months later, those wide openings become mulch catch points and weed nurseries.
When you keep cuts tight, pin the area if needed, and maintain the top layer, the barrier has a much better chance of performing the way it should.
Maintenance Troubleshooting and Your Pro Option
A weed barrier isn't maintenance-free. It's lower maintenance when it's installed well and topped correctly, but it still needs attention. In Austin, the top layer matters almost as much as the fabric because our sun is hard on anything left exposed.

Guidance from Tomahawk Power recommends covering the barrier with about 2 inches of mulch and inspecting and replenishing that layer annually to reduce UV degradation and suppress breakthrough weeds, according to its weed barrier installation guide. That's a practical baseline, especially in full-sun beds.
What maintenance actually looks like
Most upkeep is simple, but it needs consistency.
- Refresh the cover layer: Mulch breaks down, shifts, and thins out over time.
- Pull weeds early: Weeds that sprout in the mulch layer above the fabric are easier to remove when small.
- Check exposed spots: If fabric starts showing, cover it before UV has time to weaken it.
- Watch plant openings: These are common trouble spots once debris starts collecting there.
The surprise for many homeowners is that weeds don't need to come from below. Seeds blow in and root in organic matter that builds on top. That's why people sometimes think the barrier “stopped working” when the underlying problem is neglected mulch and accumulated debris.
When DIY starts costing more than it saves
If the site is simple and you enjoy the work, a DIY installation can make sense. But once you add clay grading, drainage concerns, existing shrubs, rock coverage, or a larger footprint, mistakes get expensive fast. You can spend days on prep and still end up with lifted seams, lumpy beds, and water problems after the first storm.
A professional installation buys accuracy in the hidden details. The grade is cleaner. The edges stay sharper. The drainage is thought through before the fabric goes down, not after the yard starts holding water.
A good install should make your yard easier to live with, not give you another system to babysit every month.
That's usually the tipping point for homeowners. They don't mind doing some maintenance. They just don't want to rebuild beds because the original install was rushed.
Reclaim Your Yard and Your Weekends
A solid weed barrier installation can absolutely reduce maintenance. It can also become a mess if the wrong material goes on the wrong site, the base isn't prepared, or the seams and drainage are handled casually.
That's the reality in Austin. Our climate exposes weak work quickly. Clay soil, intense sun, and sudden runoff don't give you much margin for error. If you want a clean gravel path, a tidy planting bed, or a stable base under a low-maintenance outdoor area, the job has to be built from the ground up.
You don't need perfection. You do need the right system for your yard and someone who knows how local conditions affect the result.
If you'd rather spend your weekends enjoying the backyard instead of reworking fabric, chasing weeds at the edges, and fixing drainage after every storm, it's worth getting experienced eyes on the project before you start.
If you want a weed barrier installation that's built for Austin conditions, talk with Modern Yard Landscapes. They can help you evaluate your site, recommend the right approach for your beds, paths, or turf project, and give you a clear, friendly assessment before any work begins.