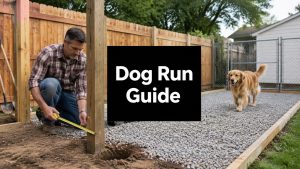
Your dog probably doesn't need a fancy backyard feature. Your dog needs a space that stays clean after rain, contains energy safely, and doesn't become a churned-up mud strip a month after you build it. That's where many dog run projects go sideways.
Most homeowners start with the fence. Professionals start with the ground, drainage, and how the dog will use the space every day. If you're researching how to build dog run areas that last, that difference matters. A run can look finished on day one and still fail by season two if the base shifts, water pools, odors build up, or the perimeter isn't built for your dog's habits.
A good dog run solves a practical problem. It keeps wear off the rest of the yard, gives your dog a reliable bathroom and exercise zone, and makes cleanup easier. A great dog run does all of that without turning into a maintenance chore. That's the standard I'd aim for in any Austin yard.
Planning Your Perfect Dog Run Before You Build
Planning decides whether this project feels easy later or expensive later. The layout, location, and size affect everything that follows, from excavation and fencing to cleanup and how often your dog wants to use the space.

Choose a location your dog will actually use
The best dog run spot is rarely the leftover strip nobody wanted. It should be easy to access, visible from the house, and comfortable enough that your dog doesn't avoid it.
Use this checklist before you mark anything out:
- Check shade first. A run with some relief from direct sun is easier on your dog and easier on any surface material.
- Think about cleanup access. If you have to drag a hose across the whole yard or squeeze through a narrow gate, maintenance gets old fast.
- Watch water movement. If the area already puddles during storms, it needs drainage work before anything else.
- Stay close enough to the house. Dogs usually do better when they can still see family activity rather than being isolated in a far back corner.
- Look at traffic flow. The gate should open where you can enter comfortably with cleaning tools, turf supplies, or a wheelbarrow.
Practical rule: The easiest place to build isn't always the right place to live with.
Size for the dog, not just the yard
One reliable sizing guideline is to make the run at least four times the length of the dog, with practical minimums of 4×6 feet for small dogs, 4×8 feet for medium dogs, and 5×10 feet or larger for big breeds, according to dog run sizing guidance from Turf Network. That same guidance notes 4 feet or more for jumpers.
Those numbers are starting points, not finish lines. A calm older dog and a young athletic dog need different layouts even if they weigh the same. If your dog paces, sprints, or likes to turn sharply, extra length usually matters more than squeezing the run into a perfect rectangle.
For homeowners with compact spaces, a side-yard design often works well. If that's your situation, this guide to a small dog run layout approach can help you think through proportions and access.
Check rules before you buy materials
Local rules aren't exciting, but they can stop a project cold. Fence height, setbacks, and placement near property lines may all be regulated. HOA rules can add another layer, especially if the dog run is visible from the street or uses a specific fence style.
A simple planning list helps:
- Confirm property lines
- Check municipal fence rules
- Review HOA requirements if applicable
- Verify gate swing and utility conflicts
- Mark irrigation, drainage lines, or other buried features
Skipping this step is how a “weekend project” becomes a teardown.
Choosing Materials for a Safe and Clean Surface
Too much time is often spent comparing fence panels and not enough time comparing what goes under the dog's feet. In daily use, the surface has a bigger effect on cleanliness, odor control, paw comfort, and maintenance than almost anything else.

Fencing materials and where each one works
Here's the short version. Most fencing options can work if they're installed correctly. The right choice depends on the dog's behavior, your visibility needs, and how permanent you want the enclosure to be.
| Material | What works | What to watch |
|---|---|---|
| Chain link | Durable, open visibility, practical for active dogs | Some dogs try to climb it, appearance isn't for everyone |
| Welded wire | Cleaner look, rigid feel, strong containment | Needs solid post installation to stay aligned |
| Wood | More privacy, warmer appearance, blends with fencing | Requires maintenance, some dogs chew or scratch it |
If your dog gets overstimulated by outside activity, privacy can help. If your dog does better when they can see you, open fencing often works better.
Surface materials and real trade-offs
Surface choice is where homeowners usually discover the difference between a cheap build and a durable build.
- Grass feels natural at first, but high traffic usually wears a path quickly. Once the grass thins, dirt takes over.
- Pea gravel drains well and is often easier on paws than sharper rock, but it migrates, gets kicked around, and doesn't always stay as tidy as people expect.
- Wood chips can look clean at installation and then become a replenishment project.
- Concrete is durable and easy to rinse, but it's harder underfoot and can hold heat.
Independent guidance on dog run planning notes that some builders use 100 sq ft for small dogs and 200 sq ft for larger dogs, but also emphasizes that the surface's ability to drain and stay clean is often more important than size alone in hot yards, as discussed in Ozinga's dog run tips.
A dog run fails slowly from the ground up. First it stays damp. Then it smells. Then the fence and edges start showing the consequences.
Why pet turf keeps winning in high-use yards
Professional artificial turf changes the conversation. Not the rolled product from a home center. A pet-focused turf system built over a drainage base.
A professional install can pair permeable turf with a compacted aggregate base, odor-control infill, and contained edges so the run stays cleaner and easier to wash down. Pet turf systems from Modern Yard Landscapes are one example of that type of setup for homeowners who want a dedicated pet surface rather than loose fill materials.
The main trade-off is upfront cost. The payoff is less mud, less material migration, and a surface that's easier to sanitize. For many dog owners, that's the difference between a dog run they're glad they built and one they're constantly trying to fix.
Mastering Site Prep and Drainage for a Mud-Free Zone
This is the part DIY builders most often underestimate. Not because it's mysterious, but because it's physical, technical, and unforgiving. If the base is wrong, everything above it eventually tells on you.

What proper prep actually looks like
A professional build starts by excavating 3–4 inches and then compacting a drainage-oriented base of gravel or limestone chips before the finish surface goes in, according to this dog run construction guidance. That same guidance warns that skipping this step is the primary cause of muddy surfaces and uneven settlement over time.
That's the heart of the project. Not the fence. Not the gate hardware. The base.
Here's the sequence that holds up:
- Mark the footprint clearly. Use paint, stakes, and string so you can read the exact boundary before digging.
- Remove vegetation and organic material. Roots, sod, and loose topsoil don't belong under a finished dog run.
- Excavate to the planned depth. Keep the subgrade consistent rather than chasing low spots later.
- Establish drainage direction. Water needs somewhere to go.
- Install and compact the base. This creates a stable, porous platform for the surface above.
Why drainage mistakes are expensive
Poor drainage doesn't always show up on day one. Sometimes the run looks fine after installation, then starts holding moisture after repeated use and weather cycles. The dog tracks in dirt. The surface gets sour. Edges start shifting. Gates stop closing cleanly.
That chain reaction is common because many DIY builds skip compaction or use base material that doesn't drain well. They treat the surface as decoration instead of part of a drainage system.
A few warning signs tell you a site needs more than basic leveling:
- Water already sits there after rain
- The soil turns soft under foot traffic
- The run is boxed in by walls, fences, or hardscape
- The area receives roof runoff
- There's no easy path for water to leave the space
If you're dealing with one of those conditions, look at drainage first, not after the dog run is installed. This overview of yard drainage corrections is useful for understanding what has to happen below the visible surface.
The expensive repair usually isn't replacing the turf or fence panel. It's tearing out a finished run so the base can be rebuilt correctly.
The professional difference is precision
Anyone can move dirt. Fewer people can shape, compact, and stabilize a base so it drains consistently and stays flat under repeated use. That's why well-built dog runs feel simple once they're done. The complexity is buried underneath.
If you want the dog run to stay dry, level, and easy to maintain, site prep isn't a prep step. It's the project.
Assembling the Dog Run Frame and Surface
A dog run starts looking finished at this stage, but this is also where weak builds start hiding future repairs. Posts set out of line, gates hung on unstable supports, and surface edges left loose usually show up later as sagging fence sections, lifted turf, and cleanup that gets harder every month.
Set posts to hold alignment under daily use
Dogs do not load a fence the way a quiet backyard does. They hit corners, brace against mesh, launch off gates, and return to the same pressure points day after day. Posts need to be installed for that repeated force, not just placed where they look straight from the patio.
A reliable install sequence looks like this:
- Set corner and terminal posts first
- Brace and align them before the footing sets
- Treat gate posts as high-stress points
- Install line posts only after the perimeter is established
- Attach panels or stretch mesh with even tension
The exact post depth depends on fence height, soil conditions, frost movement, and the size and behavior of the dog. In practice, deeper and better-braced posts usually prevent the failures I see most often, especially at gates. A gate is the first place a rushed build starts to sag because it carries weight, swings repeatedly, and gets slammed by both people and dogs.
If you're building with chain link, FenceScape's complete homeowner's chain link guide is a useful reference for hardware order, top rail connections, and mesh attachment.
Close off weak points at grade
Fence height matters, but the bottom edge decides whether the run contains the dog. Small gaps under panels, soft corners, and unprotected edges invite digging. Once a dog finds one successful exit point, that area keeps getting tested.
For dogs that dig, add a barrier below or directly at grade and tie it into the fence line cleanly. The method can vary. Buried wire, a horizontal footer, or a hard edge detail can all work if they are installed continuously and fastened well. The mistake is leaving interruptions at corners or around gate openings, because those breaks become the first failure points.
Corners deserve extra attention. They take side pressure, pacing wear, and scratching. I like to see corners framed and secured as if the dog has already chosen that spot as its project.
Build for the dog's habits at their worst, not their behavior on a calm afternoon.
Finish the surface like part of the system
The top layer has to stay in place, clean easily, and support the drainage work underneath it. That is the standard. A surface that looks good on install day but shifts, traps odor, or exposes edges after a season was not finished properly.
Loose materials can work, but they scatter, migrate, and need regular replenishment. Concrete is durable, though it can run hot and hard on joints if the run gets heavy use. Professional artificial turf gives the cleanest long-term result when the base, infill, seams, and edges are installed correctly. It stays usable in wet weather, waste cleanup is straightforward, and dogs are not grinding mud back into the house after every run outside.
If you want a closer look at the finish layer, this guide to how to install artificial turf for a durable pet-friendly surface shows the cutting, fitting, seaming, and edge-securement details that make the difference between a surface that lasts and one that starts peeling back.
A properly assembled dog run feels boring in the best way. The fence line stays straight. The gate latches cleanly. The edges stay tight. The surface stays sanitary without constant repair. That is usually the line between a quick DIY build and a dog run that still performs years later.
Long-Term Care and Enrichment for Your Dog Run
A dog run should be easy to live with. If maintenance turns into a weekly battle, the design missed something.
Keep cleaning simple
Every surface has a routine. The right one is the routine you'll stick to.
- Loose-fill surfaces need regular raking, spot cleanup, and occasional top-offs when material shifts or thins.
- Concrete rinses easily, but it may need more frequent washing if odors settle into warm areas.
- Artificial turf usually comes down to picking up solid waste, rinsing the area, and using a pet-safe cleaner as needed.
The biggest maintenance wins usually come from containment and drainage. When waste is easy to reach and liquids move through the system instead of sitting on top, the dog run stays usable with far less effort.
Add features your dog will use
A run doesn't need to be crowded with accessories. It needs a few smart additions that make the space comfortable and mentally engaging.
Consider adding:
- A shade element so the dog has relief during hotter parts of the day
- A raised cot or platform for lounging off the ground
- A water station that's easy to refill and easy to clean
- A toy zone with durable solo-play items
- A visual break if your dog gets overstimulated by neighboring activity
For activity ideas beyond the enclosure itself, ChowPow's dog exercise guide is a solid resource for mixing outdoor movement, enrichment, and routine.
A well-built dog run is a support system, not a substitute for exercise, training, or interaction.
Watch behavior, not just the structure
The best maintenance check is your dog's behavior. If your dog avoids one end of the run, paces the fence line, digs near one corner, or only uses the space briefly, pay attention. Those patterns often reveal heat issues, drainage discomfort, weak shade, or layout problems.
A dog run is successful when it stays clean for you and comfortable for the dog. If both are happening, the design is doing its job.
DIY Project or Professional Installation
A lot of dog runs look fine on day one. Then the first hard rain hits, the base shifts, water sits against the fence line, and the clean side-yard solution turns into a muddy strip that smells, stains paws, and needs to be rebuilt.
You can build a dog run yourself if you're comfortable with excavation, grading, hauling base, setting posts, and compacting properly. The decision usually comes down to tolerance for rework. A simple enclosure is manageable for many homeowners. A dog run that stays clean, drains correctly, and holds up to daily use takes more precision than the shopping list suggests.
Poor drainage is the mistake I see most often. Homeowners focus on fencing and surface appearance, then install over soft soil or skip the base work that keeps water moving down and away. That leads to puddling, odor, loose turf edges, muddy splash-up, and frost or washout damage in some yards. Fixing those problems later usually costs more than building it correctly the first time.

When DIY makes sense
DIY is a reasonable route when the conditions are working in your favor:
- The site already drains well
- The run is small, flat, and easy to access
- Your dog is unlikely to challenge the fence, gate, or edges
- You have the tools for digging, moving aggregate, and compacting the base
- You can spend the time to correct grade issues instead of covering them up
In those cases, a careful homeowner can build a solid run. The key is staying disciplined about base prep and not treating drainage as a minor detail.
When a professional earns the cost
Professional installation makes more sense when the yard has slope, tight access, existing drainage issues, or a dog that puts real stress on the enclosure. It also makes sense when you want a finished pet turf system that looks clean and performs like a permanent part of the yard rather than a temporary pen.
For medium-to-large dogs, fence height and placement often need a closer look, and local rules can affect what you can build near property lines, as noted in this dog run side-yard guidance. An experienced installer handles those constraints together with grading, base depth, edging, gate swing, and surface selection.
That coordination matters.
Professional artificial turf is usually the best long-term surface when the goal is a cleaner, safer, lower-maintenance dog run. Installed over the right base with proper drainage, it avoids the mud cycle that ruins many DIY builds. It also gives you a surface that is easier to rinse, easier to sanitize, and more stable under repeated traffic. Cheap turf over poor prep does not deliver those results. Good materials only perform if the foundation is built correctly.
At Modern Yard, we assess the site first, then recommend the build based on drainage behavior, dog size, use patterns, and access. If the project is simple, we'll say so. If the yard needs grading correction or a full pet turf system to prevent ongoing mess and repair costs, we'll say that too. Honest planning saves money.
A well-built dog run should be uneventful to own. The gate latches cleanly. The surface drains. The dog stays contained. You don't deal with mud after every storm.
If you want help turning a problem patch of yard into a clean, durable pet space, contact Modern Yard Landscapes. We can assess drainage, layout, fencing needs, and surface options, then give you a clear path forward for a dog run that fits your yard and your dog.