A lot of Austin homeowners start in the same place. There's a slope in the yard that keeps washing out, mulch ends up where it shouldn't, and the area you wanted to use for grass, a fire pit, or planting beds never really becomes usable. You look at retaining wall photos online and it seems straightforward enough. Dig a trench, stack block, backfill, done.
That's where many walls go wrong.
In Austin, retaining wall installation has to deal with two local realities at the same time. First, we have clay-heavy soils that expand, shrink, and shift. Second, we get intense rain that can move a lot of water across a property fast. A wall that looks fine right after construction can start leaning, separating, or bulging later if the base, drainage, and reinforcement weren't handled correctly from the start.
Modern retaining walls aren't just decorative outdoor features anymore. Current U.S. practice treats them as structural work that should align with the International Building Code and ASCE guidance, with excavation, base prep, compaction, drainage, and reinforcement all treated as essential parts of the build, as outlined in this retaining wall design overview.
Your Austin Yard Has a Problem We Can Solve
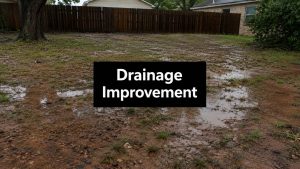
That slope in your backyard isn't only a cosmetic issue. It steals usable space, pushes water where you don't want it, and makes planting or mowing harder than it should be. In many Austin yards, the main issue shows up after a storm. Soil creeps downhill, edging shifts, and the bottom of the yard turns into a collection point for runoff.
A retaining wall can fix that. It can create level grade, protect against erosion, and turn a difficult area into something functional. It can also fail if it's treated like a simple weekend hardscape project.
Why Austin makes this harder
Generic DIY guides assume predictable soil and moderate weather. Austin gives you neither. Clay soil doesn't behave like loose garden dirt. It moves. It holds water in some spots and dries out hard in others. Then a strong rain hits, and the pressure behind a wall changes fast.
That's why a proper wall isn't just about the face material. The visible block or stone matters less than the excavation, footing, compaction, and drainage hidden behind it.
Practical rule: If the wall has to hold back active soil on a slope, treat it like structural work, not yard decor.
This is also the point where homeowners usually decide whether they want to manage design choices, materials, base prep, drainage details, cleanup, and compliance on their own, or have an experienced crew handle it. If you're comparing options, it helps to look at local retaining wall contractors near you in Austin and judge them on process, not just appearance.
What works and what doesn't
Some small garden walls are DIY-friendly. A wall meant to retain a slope is different. The failures I see most often come from the same decisions:
- Too little excavation: The trench gets dug just deep enough to hide the first row.
- Weak base material: Native soil gets used where compacted gravel should be.
- No drainage path: Water collects behind the wall and starts pushing.
- Poor layout control: The first course isn't level, so every row above it follows the mistake.
Homeowners usually call after the wall has started moving. By then, repair often means removing much of the original work and rebuilding it correctly. It's cheaper and much less frustrating to build it right the first time.
Planning Your Austin Retaining Wall Before You Dig
A lot of retaining wall problems in Austin start before the first shovel hits the ground. The wall gets planned like a garden feature, but once it holds back wet clay on a slope, it has to perform like structural work. Our soils swell, shrink, and stay heavy after a hard rain. Flash runoff adds pressure fast.

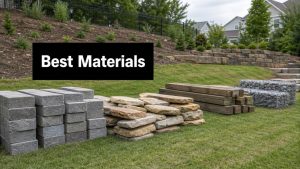
Choosing a material that fits Austin conditions
Appearance matters, but material choice should start with soil movement, drainage, and how much margin for error the system gives you.
| Material | What homeowners like | What to watch in Austin |
|---|---|---|
| Segmental concrete block | Clean lines, repeatable installation, good for curves and tiers | Needs accurate layout, drainage stone, and reinforcement where required |
| Natural stone | Timeless look, strong visual character | More labor-intensive, more variation, harder to keep consistent and stable without experience |
| Timber | Lower upfront material cost and a familiar look | Shorter service life in wet conditions and more exposure to insects |
For many residential walls here, segmental block is the practical choice. The units are consistent, they work well with drainage aggregate, and they can be engineered for taller or more demanding conditions. Natural stone can last and look great, but the install tolerance is tighter, and the labor cost usually climbs because every course takes more fitting.
If you are still comparing shapes and finishes, these retaining wall design ideas for Austin yards can help you sort out whether the project calls for a straight wall, a curved layout, or multiple terraces.
Permits and engineering need attention early
Homeowners often want to focus on block, stone, and color first. In Austin, height, drainage, and grade change usually matter more in the planning stage.
One retaining wall guide notes that taller walls may require engineer approval, and some walls need geotextile reinforcement when block weight alone is not enough to resist soil pressure, according to this retaining wall installation basics guide. That lines up with what I see on local jobs. A wall that looks modest from the patio side can be much taller from the low side, and that changes the design, the excavation plan, and the permit path.
Austin projects also run into utility locations, setback limits, and drainage rules that generic DIY articles barely mention. If you want a plain-language primer on why permits deserve attention before construction starts, Aureli Construction has a helpful article on understanding building permits for additions. It covers additions, but the same permitting mindset applies to structural site work.
A retaining wall can look like yard decoration from the street and still behave like a structural system underground.
Planning questions that save money later
Before digging, answer these questions clearly:
- Where will runoff discharge: Water needs a controlled path, especially during Austin's intense storms.
- What soil is the wall holding back: Expansive clay creates different pressure than drier, more stable soil.
- How tall is the wall at its highest exposed point: Sloping yards hide true height until layout is marked.
- Can equipment reach the work area: Access affects compaction quality, labor time, and material handling.
- Will the wall carry extra load: Fences, foot traffic, driveways, or upper terraces can change the design requirements.
These choices decide whether a DIY build has a realistic chance of lasting. For a short decorative border, do-it-yourself may be reasonable. For a wall retaining Austin clay on a slope, with runoff to manage and code questions in play, professional planning usually costs less than tearing out a failed wall and building it again.
The Foundation Is Everything Site Prep and Base
A retaining wall usually fails below grade long before anything looks wrong from the yard. In Austin, I see the same pattern over and over. The trench is skimmed, the base is uneven, or the first course is a little off. Then a hard rain hits, the clay shifts, and that small setup mistake turns into lean, settlement, or a cracked wall face.
What the base actually needs

Manufacturer guidance for segmental retaining walls is pretty clear. Allan Block's residential installation guidance calls for a trench that is typically 24 inches wide and 6 inches deep plus 1 inch for every foot of wall height, followed by a compacted base of about 3 inches of crushed rock, compacted with at least two passes of a plate compactor.
Those numbers are not arbitrary. A properly sized trench gives the wall room to bear evenly, and the crushed rock base helps control settlement and moisture movement. In Austin, that matters because the native soils rarely stay consistent for long. Dry spells harden the ground. Storms soften it fast.
A DIY build can survive only if the prep work is done carefully and checked constantly. The base has to be flat, compacted, and level in both directions before the first block goes in.
Why Austin clay exposes lazy prep
Austin clay fools homeowners because it often looks solid at the surface. Dig a few inches and you can hit softer pockets, old fill, buried roots, or soil that turns slick after one storm. Add a slope, roof runoff, or a low spot in the yard, and the base work gets much less forgiving than a generic DIY guide makes it sound.
Good prep is repetitive, but that is the job:
- Excavate to clean, undisturbed soil: Remove roots, loose fill, wet pockets, and organic material.
- Use angular crushed rock: It compacts and drains better than random gravel, caliche lumps, or native spoil.
- Compact in lifts: Dumping it all in at once leaves voids that show up later as dips or rotation.
- Check the trench and first course constantly: A small error at the bottom gets bigger with every course.
The first row controls the wall. If it is out of level, the rest of the installation only hides the problem for a while.
Why homeowners underestimate this phase
Homeowners usually picture the wall face. The hard part is everything you have to do before any block is visible. Hauling spoil out of a tight side yard, bringing in aggregate, keeping the trench square, and compacting properly on a slope takes time and the right equipment.
The same principle shows up in other outdoor projects. Van Dyke Outdoors has a practical article on site preparation for sheds in Georgia that makes the point well. The ground under the structure often decides how long the structure lasts.
For retaining walls, that means choosing the right aggregate and building the base in a controlled way. If you want a closer look at what should go under the wall, this guide to retaining wall base material explains the difference between suitable base stone and the filler materials that cause trouble later.
Base mistakes that cause expensive repairs
| Mistake | What happens later |
|---|---|
| Digging only for the visible block | The wall settles unevenly and the face starts to step |
| Setting on native clay or loose fill | Seasonal swelling and shrinkage push the wall out of alignment |
| Using the wrong stone or ungraded material | Drainage and compaction become inconsistent |
| Rushing compaction | Hidden voids show up later as dips, lean, or separation |
| Treating the first course like a rough starting point | Every course above it carries the same error |
This part of the work is dirty, slow, and easy to rush. It is also where a retaining wall in Austin either gets a real chance to last or starts failing before the caps ever go on.
Building Strong Stacking Backfill and Drainage
A retaining wall usually fails from the back, not the face. Homeowners see clean block lines and finished caps. The critical test comes later, after an Austin thunderstorm dumps water into clay soil that already drains slowly.

Stacking is the visible part of the work
After the base is set correctly, the block still has to go in with a consistent running bond. Mutual Materials notes that vertical joints should be offset by at least 1/4 block length in its installation instructions. That matters because straight stacked joints create weak lines in the wall face and make small layout errors easier to see from across the yard.
Interlocking pins and rear lips help keep setback consistent, but they do not fix poor placement. If one course wanders, the next course follows it. By the time the wall reaches full height, a small alignment mistake at the bottom can show up as a bowed face, uneven reveal, or blocks that no longer seat tightly.
Drainage is what keeps pressure off the wall
Austin soils make this part harder than a lot of national DIY guides admit. Clay holds water, then swells. A dry stretch can shrink that same soil back. Add one hard rain, and the ground behind the wall gets heavy fast.
That is why the space behind the wall cannot be treated like a hole to fill with leftover dirt from the excavation. It needs a drainage column made with clean stone, a perforated pipe set to drain out properly, and separation fabric where needed so fines do not migrate into the rock and choke the system.
Good drainage work usually includes:
- Washed drain rock behind the wall: Clean angular stone leaves open space for water to move.
- A perforated pipe at the back of the base: The pipe needs a real outlet, not a dead end buried in clay.
- Backfill compacted in thin lifts: Thin lifts reduce voids and keep the retained soil from settling later.
- Protection from fines: Clay and silt can contaminate the drainage zone if fabric and placement are sloppy.
In Austin, the outlet is often the detail that gets missed. I have seen plenty of walls with pipe behind them and nowhere for the water to go. That pipe then holds water instead of relieving it.
If the yard already has runoff problems, the wall drainage may need to tie into a larger drain tile system installation so the water has a controlled path away from the slope.
Water will always test the weakest part of the wall. In Central Texas, that test usually comes sooner than homeowners expect.
Backfill technique matters as much as material choice
Dumping soil in one pass and tamping the top is a common DIY mistake. The face may look fine at first, but loose pockets stay buried behind the wall. Later, those pockets settle, the soil shifts toward the voids, and the wall can start to lean or separate.
The fix is slow, repetitive work. Add backfill in controlled lifts. Compact each lift without knocking the block out of line. Keep heavy equipment far enough from the wall face that it does not overload the edge during construction. This is one reason professional crews tend to get better long-term results. They have the compaction tools, access to the right aggregate, and enough experience to keep the wall straight while the pressure builds behind it.
When reinforcement changes the build
Some short walls can rely on block mass and proper drainage alone. Taller walls, surcharge loads, and sloped sites often need reinforcement that extends back into the retained soil. At that point, the wall is no longer a basic weekend stack-up. It is a system with layout rules, embedment requirements, and very little room for guesswork.
That difference matters in Austin. A decorative garden wall and a wall holding back a wet clay slope may use similar block, but they are not the same job. If the wall has to survive heavy rain, shifting soil, and years of pressure without movement, the backfill and drainage details have to be installed correctly the first time.
Advanced Considerations and Common Pitfalls
The walls that cause the most trouble usually aren't the straight, low, open-yard installations. Trouble starts when the lot is steep, the plan includes tiers, or the soil stays wet longer than expected.

Terraced walls are not just two small walls
Many homeowners assume that if one wall works, two stacked walls will work better. That's not how soil loading behaves.
Water Shapes gives a very clear warning: when building terraced walls, you should “never use a lower wall to support an upper wall,” and the upper wall must be set back at least one-and-a-half times the lower wall's height to maintain stability, according to their retaining wall guidance.
That single rule eliminates a lot of attractive but risky backyard sketches.
Red flags that mean the project needs more than basic DIY planning
Some conditions should slow you down immediately:
- Terraced layouts on a steep lot: Geometry and setback matter as much as wall height.
- Poorly drained or expansive soil: Standard details may not be enough.
- Walls that tie into driveways, patios, or foundations: Adjacent structures change the consequences of movement.
- Irregular grade changes: The wall may become much taller at one end than expected.
A separate but related issue is soil-specific drainage strategy. Public guides often say to install pipe and gravel, but they don't always answer what to do when soil stays saturated or runoff concentrates in one corner. Unilock's wall guidance emphasizes perforated pipe, gravel backfill, and graded swales, while Water Shapes adds that critical walls may need soils engineering and that even a four-inch perforated pipe wrapped in fabric should daylight beyond the wall, as discussed in this wall construction overview from Unilock.
The pitfall isn't ambition. It's false simplicity.
There's nothing wrong with wanting a more functional yard. The problem is assuming every retaining wall follows the same recipe.
A wall can be short and still be complicated if the slope, water movement, and surrounding grades are working against it.
Experience pays off. A professional regularly working with Austin's outdoor environments will look at the uphill load, the clay content, where runoff enters the area, and whether the wall stands alone or interacts with another wall. Those aren't luxury considerations. They're the difference between a clean finished project and a callback waiting to happen.
The Real Cost and Why a Pro Is Your Best Investment
When homeowners budget a retaining wall, they usually start with the block price. That's understandable, but it leaves out much of the entire job.
The cost isn't only the wall face. It's excavation, gravel, backfill, drain pipe, geotextile, delivery, spoil removal, and equipment. It's access problems when the backyard is tight. It's the time and labor required to move dense material repeatedly, keep courses level, and manage water correctly in the middle of an Austin weather swing.
What DIY often underestimates
DIY retaining wall installation can make sense for a very small, low-risk project. But people often underestimate a few things:
- Equipment needs: A plate compactor, cutting tools, and often excavation help.
- Material weight: Gravel and wall units add up fast.
- Rebuild risk: One bad base or drainage decision can force a teardown.
- Permit and engineering questions: These don't disappear because the homeowner is doing the work.
That's why the cheapest-looking route isn't always the least expensive one.
What you're really buying with professional installation
Hiring a pro means you're not just paying for labor. You're paying for layout judgment, correct sequencing, proper compaction, drainage planning, and familiarity with local soil behavior. You're also paying to avoid the cost of doing the same wall twice.
One option Austin homeowners consider is Modern Yard Landscapes, a local landscaping company that installs retaining walls and drainage systems as part of broader site work. The practical value in hiring any qualified local crew is the same. They should understand access, runoff, grading, and how Austin conditions affect long-term wall performance.
If your yard has a real slope problem, the smartest next step is simple. Have someone look at the grade, the soil behavior, and where the water is going before you buy materials. A clear site visit usually answers the questions that online tutorials can't.
If you're dealing with erosion, runoff, or a sloped yard that never feels usable, schedule a consultation with Modern Yard Landscapes. You'll get a practical look at what your site needs, what the build should include, and whether the project is suited for a simple wall or a more engineered solution.