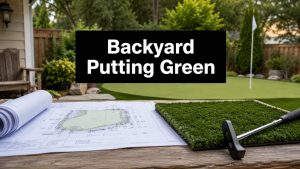
You're probably looking at a patch of backyard and thinking the same thing a lot of Austin homeowners think. It would be nice to walk outside with a putter, roll a few practice putts before dinner, and have a green that feels good underfoot instead of looking like a novelty feature that got rough after one hard rain.
That's the fundamental distinction between a putting green that stays fun and one that becomes a regret. If you want to design a putting green in Austin, the shape matters, the turf matters, and the cup locations matter. But the projects that last are the ones that start with a serious plan and are built for Austin soil, Austin heat, and Austin storms.
A backyard green should do two things at once. It should fit your property naturally, and it should play true every time you use it. When either side gets ignored, the result is obvious. The green looks out of place, drains poorly, rolls inconsistently, or ends up being too gimmicky to enjoy.
From Backyard Dream to Design Document
Stepping out the back door in your gym shorts and hitting putts before work is the easy part to imagine. The harder part is deciding what that green needs to do for you, where it belongs, and how much yard you're willing to dedicate to it.
That first planning conversation drives everything that follows.

Start with the use, not the shape
A lot of people begin by sketching a kidney bean outline on paper. That's backwards. First decide how you'll use the space.
If the goal is casual family fun, the design can lean forgiving. Softer movement, easier cup positions, and a layout that welcomes kids and guests makes sense. If the goal is short game practice, the green needs tighter contour control, cleaner edges, and a surface built for repeatable roll.
Practical rule: A green built for serious practice has to be playable on an ordinary Tuesday, not just impressive on installation day.
Ask yourself a few direct questions:
- Daily use or occasional use: If you'll putt often, access from the house matters more than people think.
- Putting only or chipping too: If you want to hit bump-and-runs or short pitches, you need room around the surface, not just the green itself.
- Clean aesthetics or golf-first performance: Some homeowners want the green to disappear into the surroundings. Others want it to read like a golf feature. Both can work, but the build choices differ.
Pick the right spot in the yard
In Austin, location is rarely just about what looks open. It's about what stays stable.
Tree cover can be helpful for comfort, but too much overhead drop means more leaves, more seed pods, more cleanup, and more risk of root interference near the edge. Full sun can be great for a clean, open look, but it also puts more pressure on the turf system and infill under Texas heat. The route into the yard matters too. If equipment access is tight, the construction approach has to adjust from the start.
Here's what I look at first on a site walk:
Drainage path
Water already tells you where it wants to go. Don't fight that blindly.Surrounding grade
A low pocket in the yard can turn into a problem if runoff from patios, beds, or neighboring slopes moves toward the green.Usable approach space
If you want to chip, you need fringe or apron areas that make sense with your stance and swing.Sight lines from the house
A putting green should feel intentional from the patio, kitchen window, or pool deck. Good design improves the whole yard, not just the golf feature.
Size and shape should follow the yard
Bigger isn't always better. I've seen compact greens outperform oversized ones because the layout was disciplined and the contours were believable.
A strong design usually has:
- Simple outer lines that fit the property
- Enough depth for multiple putt lengths
- Realistic transitions into the surrounding area
- Room for maintenance access around the perimeter
The shape should also match the architecture of the home and hardscape. Crisp modern homes usually look better with cleaner geometry. More natural surroundings can support softer edges.
If the outline looks forced from the patio, it'll keep looking forced long after the novelty wears off.
When homeowners call to talk through a project, the most productive conversations start with a rough wish list and a few site photos. That's enough to separate a decorative green from one that can improve your short game. If you want to design a putting green that lasts, the plan on paper matters more than the excitement of getting turf down quickly.
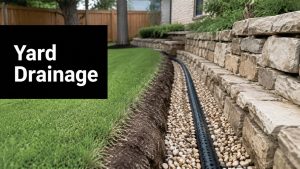
The Unseen Foundation of a Perfect Putt
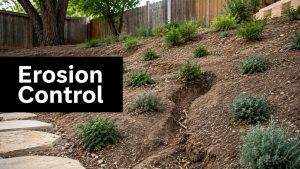
Most failed backyard greens don't fail at the surface. They fail below it.
In Austin, that matters more than many homeowners expect. Clay soil moves. Heavy downpours expose weak grading fast. If the base isn't excavated correctly, drained correctly, and compacted correctly, the green won't stay smooth no matter how nice the turf looked on day one.

Why Austin soil changes the whole approach
A lot of DIY builds start with the wrong assumption. Dig out a shallow area, dump in base material, compact it once, and move on. That might hold for a while in a forgiving site. It doesn't hold well in a yard with expansive soil and intense weather swings.
When clay takes on water and then dries out, movement follows. That movement shows up as soft spots, shallow birdbaths, edge separation, or subtle lumps that make putts drift for the wrong reason.
That's why the foundation is the job. The turf installation is important, but the base determines whether the green plays the same way next season.
What a professional base actually involves
A proper build has stages, and each one does a different job. Excavation creates room for structure. Grading establishes drainage direction. Aggregate layers create stability. Fine shaping creates the contours. Final compaction locks in consistency.
For homeowners trying to understand the anatomy of the build, this guide to synthetic grass base material is useful because it explains why the support system under the turf is not interchangeable with basic fill.
A sound process usually includes:
- Controlled excavation so the finished green sits correctly relative to patios, walkways, and surrounding grade
- Drainage planning that moves water away before it can saturate the base
- Layered aggregate installation rather than one bulk dump-and-spread approach
- Mechanical compaction done in stages, not guessed at by foot feel
- Fine contour shaping after the structural layers are stable
A green can look smooth before the first storm and still be built wrong.
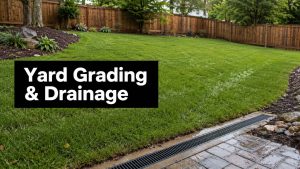
Drainage deserves special attention in this climate. If your yard already holds water, or if runoff comes across the site from uphill areas, it's smart to understand expert drainage solutions before finalizing the layout. Good drainage planning protects the green and the surrounding area.
What doesn't work
The shortcuts are predictable. So are the repair calls.
A thin base tends to telegraph movement from below. Loose material under the cups creates wobble and soft settling. Weak perimeter support lets the edge drift or sink. Once those problems show up, the fix is rarely cosmetic. It often means opening the green back up.
That's why this part of the project usually separates a weekend installation from a real construction job. The homeowner sees turf at the end. The installer has to think like a grader, a drainage contractor, and a finish carpenter all at once.
If you want a surface that stays true through hot summers and pounding rain, the base can't be “pretty close.” It has to be right.
Choosing Your Turf and Infill for True Roll
Here, performance gets personal. Two greens can look almost identical from the patio and play completely differently once you put a ball down.
The turf fiber, backing, density, and infill all affect how the ball rolls, how the surface feels underfoot, and how the green handles Austin sun. For homeowners evaluating options, it helps to review the main categories of artificial turf for putting greens before choosing based on appearance alone.
Turf choice is a playability decision
Some turf products are built to look lush from a distance. Others are built to roll cleanly. Those aren't always the same product.
For a putting green, the pile needs to support a controlled roll without becoming spongy, grabby, or too slick in the wrong conditions. Backing quality matters too, especially when heat and expansion become part of the equation over time.
The most common homeowner trade-offs look like this:
| Artificial Turf & Infill Comparison | Pros | Cons | Best For |
|---|---|---|---|
| Nylon putting turf | Holds shape well, handles heat better, supports crisp ball roll | Usually costs more, can feel firmer | Dedicated golfers who care most about performance |
| Polypropylene putting turf | Softer feel, often easier on the budget, good visual finish | Can wear faster under heavy use, not always as stable in harsh heat | Casual residential greens with moderate use |
| Silica sand infill | Familiar option, supports fiber, helps tune roll | Can make the surface feel firmer if not dialed in carefully | Homeowners who want a straightforward performance setup |
| Specialty rounded infill | Better feel tuning, more refined response, often more consistent underfoot | Higher material cost, requires an installer who knows how to calibrate it | Higher-end greens where ball behavior matters |
| Landscape turf with generic infill | Easy to find, can look green and neat | Doesn't putt like a real green, often produces inconsistent speed | Decorative areas, not serious putting surfaces |
What to prioritize in Austin
In this market, I'd rather see a homeowner spend carefully on the right turf system than overspend on a large footprint with the wrong surface.
Heat resistance matters. UV stability matters. Seam integrity matters. If the product was chosen because it looked nice on a sample board but wasn't intended for putting performance, the green will tell on itself quickly.
Look for these qualities when comparing materials:
- Dense, purpose-built putting fibers instead of broad general-purpose blades
- UV-resistant yarns that won't age poorly in direct Texas sun
- Stable backing that supports clean installation and lasting seams
- Compatible infill options that let the installer tune roll rather than guess
- A fringe material that complements the green if you plan to chip
The wrong turf can still look expensive. It just won't play like golf.
Infill controls more than most people realize
Infill isn't a throwaway detail. It helps support the fibers, influences pace, and changes the sound and feel of impact. Too little, and the surface can feel soft and inconsistent. Too much, and the green can get harsh, fast in a bad way, or less natural on chip reception.
This is one of the areas where sample testing matters. A good installer doesn't just pick a turf and move on. They think about how the full system will behave after brushing, settling, and regular use.
Some homeowners want a smooth, straightforward putting surface for family use. Others want a faster, more exacting roll. Both are valid. The important thing is matching the material package to the goal instead of forcing one product to do everything.
Modern Yard installs custom putting green systems with UV-resistant turf options and advanced infill choices, which is the kind of approach that makes sense when the climate is hard on surface materials and the client wants the green to keep its character over time.
Finishing Touches That Define Your Green
The final details are where a backyard green stops being a turf insert and starts feeling like a golf feature.
This is the part homeowners usually notice first, even though it comes after all the structural work. The subtle break that makes a short putt interesting. The cup placement that creates several different looks from one stance area. The fringe that turns a few putts into a short game session.

Contours should challenge you, not annoy you
A good backyard green isn't flat, but it also shouldn't feel like mini golf.
The shaping that works best is usually restrained. One shoulder that feeds gently toward a cup. A soft ridge that creates two distinct putt lines. A back section that asks for pace control without becoming silly. The challenge should come from subtlety, not from exaggerated mounds.
I've seen homeowners ask for “a lot of break” because they want the green to feel advanced. Then they realize they can't hold a ball near half the cups or hit a normal practice putt from one end to the other. That gets old fast.
Cup placement and fringe make the green more useful
Cup positions should create variety from multiple directions. One well-shaped surface can offer a straight putt, a left-edge swinger, and a delicate downhill tester depending on where you start.
That's why cup planning is more than dropping holes into open areas. It's about how the contour feeds each location and whether those putts stay enjoyable over time.
Useful finishing details often include:
- A realistic fringe collar for chip shots and visual framing
- Clean cup installation so the hole edges stay crisp
- Commercial-grade edging to hold the perimeter neatly
- Transitions to beds, pavers, or lawn that don't feel abrupt
- Optional lighting if the green sits near an evening entertainment area
If the green is part of a larger outdoor setup, thoughtful landscape lighting design can make the area usable after sunset and help the contours read better from the patio.
The best finishing work is easy to overlook because nothing feels awkward, forced, or unfinished.
Accessories should support the experience
Details like flagsticks, cups, and practice accessories matter more than people expect. Cheap components can make a polished green feel temporary.
If you're dressing up an indoor golf room or tying your outdoor green into a recreation space, there are some high-quality golf accessories for man caves worth looking at for inspiration on finish details and presentation. The key is to choose accessories that match the quality of the build rather than treating them as an afterthought.
The final look should feel settled into the yard. Not dropped onto it. That takes design restraint, careful shaping, and a crew that cares about the edges as much as the center cup.
Budgeting Your Project and When to Hire a Professional
The honest answer on cost is simple. The budget depends on the site, the design, and the performance level you want. Access, grading difficulty, drainage needs, edge work, fringe areas, cup count, and turf selection all move the price.
That's why broad ballpark quotes without a site review usually don't tell you much.

Where the investment goes
Homeowners often focus on turf because it's the visible line item. In practice, the budget usually follows the labor and construction complexity behind the surface.
The main cost drivers are:
- Site preparation such as excavation, haul-off, grading, and access constraints
- Base construction including drainage components, aggregate layers, and compaction
- Surface materials like putting turf, fringe turf, infill, and cups
- Finish work including edging, transitions, lighting coordination, and surrounding area repair
If you want a clearer picture of the moving parts, this page on putting green installation cost gives a practical breakdown of what tends to affect price.
DIY can save money, but only if nothing goes wrong
DIY works best when the site is forgiving, the performance expectations are modest, and the homeowner is comfortable managing excavation, grading, compaction, seaming, and finish detail. That's a narrower lane than commonly assumed.
The hidden cost in a DIY green is rework. If the drainage is off, if the contouring is awkward, or if the surface settles unevenly, the repair usually means pulling materials back up. You don't just patch your way out of a bad foundation.
Here's the practical split:
| Path | What it can offer | Where it goes sideways |
|---|---|---|
| DIY build | More direct control, lower labor outlay, hands-on involvement | Mistakes in grading, compaction, seams, edging, and cup installation can be expensive to correct |
| Professional build | Coordinated site prep, proper equipment, cleaner finish, insured installation | Higher upfront commitment and less day-to-day tinkering from the homeowner |
If you care more about long-term roll than the thrill of building it yourself, professional installation usually makes more sense.
A good contractor should be transparent about what the site needs and where the money is going. That's part of building trust. You should be able to ask why a drainage line is recommended, why access affects labor, or why a certain turf system fits your goals better than another. Clear answers matter.
In Austin, the projects that most often justify a professional build are the ones with clay-heavy soil, tricky runoff, custom contours, or homeowners who want the green to look clean and stay consistent for years. That's where experience saves frustration.
Avoiding Common Backyard Green Disasters
In Austin, the phone call usually comes after the first big rain or the first long heat stretch. The green looked great on install day. Six months later, the ball starts wobbling, the edges start lifting, and one cup suddenly sits higher than the other.
That is the point where a backyard hobby project turns into a rebuild.
The complaints are usually specific. “It putts fast in the morning and dead in the afternoon.” “The fringe is creeping into the green.” “We hose it off, but it still smells musty after rain.” “My guests keep asking why every putt breaks the wrong way.” Those are not cosmetic issues. They point to a build that was never set up for Austin soil, sun, and storm cycles.
Heat is one of the quiet failures here. In Central Texas, cheaper turf systems can get stiff, glossy, or oddly grabby once they bake through a summer. A green might still look green from the patio, but the roll starts to feel inconsistent underfoot and under ball. Homeowners often blame the turf itself when the underlying problem is the whole system. Turf, infill, adhesive, and edge restraint all need to handle sustained heat.
Then the rain exposes the shortcuts.
I have seen greens where the collar stays put but the putting surface shifts just enough that putts begin to drift near the cups. I have seen DIY cup installs loosen because the material around the sleeve was never locked in properly. On clay-heavy lots, I have also seen the perimeter heave after alternating drought and downpour cycles, which leaves the surface looking finished from ten feet away and playing wrong from three.
Some failures are easier to spot right away:
- Shiny wear paths: Traffic routes from the house or patio start matting down before the rest of the green.
- Frayed edges: The border gets ragged from mower contact, foot traffic, or weak attachment.
- Birdbaths around cups: Small low spots hold water after a storm and slow putts in the scoring zone.
- Noise underfoot: A hollow or crunchy feel can mean the build layers are separating or shifting.
Those are expensive warnings, because repair is rarely a quick patch. Once movement starts, the clean fix often means pulling back sections, resetting details, and chasing color match problems on the reinstalled turf.
This is why the best greens are usually the ones that look a little boring during construction. Good crews spend time on the parts a homeowner never posts online. Clean cup placement. Stable perimeter restraint. Materials that can take August heat without changing character. A layout that still works after one dry month and one week of hard rain.
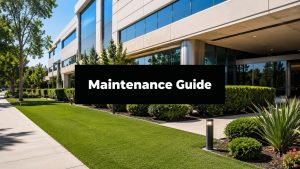
A backyard green should settle in and get better with use, not reveal a new problem each season.
If you're ready to design a putting green that fits your yard, plays true in Austin conditions, and still looks right years from now, talk with Modern Yard Landscapes. A site visit is the fastest way to sort out what's realistic, what will hold up in your yard, and what kind of green will be worth walking out to every day.